
Outline text in Photoshop Photoshop Tutorial
How to make outline text in Photoshop
How to create text with a metallic outline in Photoshop.

Newer method for Photoshop CC here 
Step 1

Start with a blank layer and some text, this will work for shapes too.
Step 2
Right click/Cmd click on the layer name in the layers pallette. Select rasterize layer. Ctrl/Cmd click on the layer thumbnail to select the type.
Step 3
Create a new blank layer.
Edit>stroke. I added a 6 pixel stroke here. Make the location center.
Click ok.
Ctrl/Cmd click on the layer thumbnail to select the new stroke.

Step 4

In the layer palette, turn off the bottom layer, you should see the outline now.
Using the gradient tool: foreground to background linear – Black to white. apply a gradient to the selection.
Step 5

Now apply the stroke again, this time 1 Pixel and set to outside.
Step 6
To make the gradient look like metal, use our favorate curves trick.
Image>adjust>curves, use a similar curve to what is shown here.

Step 7

Now display the bottom layer again and fill with a color or a gradient to get this result.
Step 8

For a little extra depth apply a layer style to the outline, use a dropshadow.
Step 9

Here is the result.
Step 10

Another variation is to hide the fill and just use the outline with a dropshadow.
Step 11

Here is yet another variation. This is just the previous image inverted. Ctrl/Cmd+I Note for this to work, you must flatten the image first.
Step 12

Here is another variation. Play around with this effect and have fun.
See you in a week with another new tutorial.
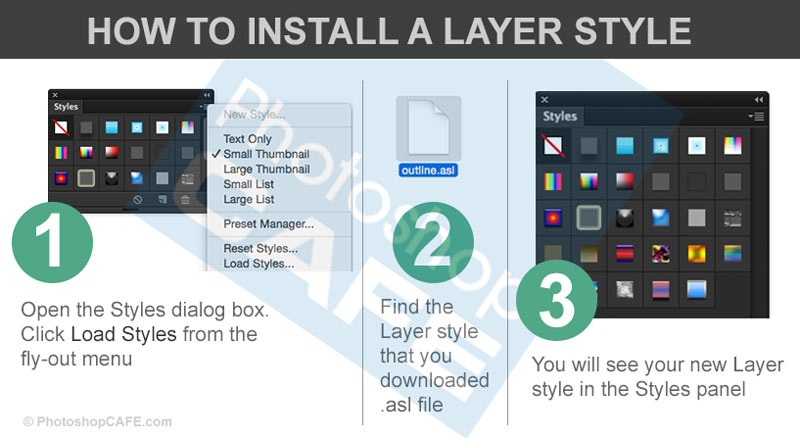
Beveled outline text with a Layer style
Here is a newer versions of the effect that I have created with a layer style
Also see the tutorial on creating a metal wire text effect as shown here

PS Don’t forget to follow us on Social Media for more tips.. (I've been posting some fun Instagram and Facebook Stories lately)
You can get my free Layer Blending modes ebook along with dozens of exclusive Photoshop Goodies here

10 thoughts on “Outline text in Photoshop Photoshop Tutorial”
Leave a Reply

How to make the apple liquid glass effect in Photoshop

How to combine photos and match the colors in Photoshop. Free photoshop tutorial for beginners.

In photoshop composites, models are shot in a different environment to the background plate used. A challenge is matching the...


Why thankye kindly. This was well laid out and extremely helpful.
Sounds like a lot to do for a simple outlining of text. Seems like a rather large oversight for PS to not have something so simple
How hard is it to download an apply a preset? Pretty simple to me.
What would be easier is if PS has a stroke feature in the text tool box. I have since found a simpler way to do it than explained here, but I don’t see why it couldn’t be implemented into a toolbox before rasterizing the layer.
That is how Paint Shop Pro always used to do it. It’s a headache to do it with PS.
Don’t forget this is the old way, they new way is here http://photoshopcafe.com/wire-text-photoshop-tutorial
Why does this look like it’s from Windows 2000? I don’t think the version of photoshop around in 2016 is compatible with anything older than Windows 7 so why was this out of date tutorial posted?
Because I made this tutorial a million years ago, we have been around since 2000 😉
Why not delete or update this page since the info is over ten years out of date? Seriously.
There is a link at the top to the CC version. Many people are on older versions and still find this tutorial very relevant, that’s why.