
Override the video limitations on the Canon 5D mk2 for better video shooting

If you’re like me and have used the Canon 5D mk 2 for video, you will have noticed a few things. The first thing is the outstanding quality of the video. You are able to shoot at full-frame 1080p. (1920 x 1080 – non interlaced). This is the holy grail of HD video. The fact that you can use the DSLR lenses ads a film-like quality to your video. With the nice shallow depth of field you are now able to capture something that resembles a cinema camera, or at least a high-end video camera worth $100,000 or so.
You will also have noticed some drawbacks. The audio sucks really bad because of Canon’s AGC Auto Gain Control in the audio. The footage is H.264 so it does show some minor artifacting and the lack of decent focusing controls. I have found a great workarouns by using the free Magic Lantern firmware hack. Let’s examine how it works and a plain english installation walk through. 
Magic Lantern doesn’t replace the firmware on your camera. You install it onto a CF card and then run it when you need to shoot video. Bottom line, it doesn’t overwrite your cameras firmware. When you restart the camera, it goes back to normal.
Why the bad audio? AGC sets the volume of the input based on the sound the microphone hears. It samples the audio level and automatically adjusts for it. This results in a very noisy signal with distortion. When you first start, you will hear the sound go really loud and distort, then settle in. This can be avoided by doing an audio count-in for each recording. Using ML you can avoid this by setting manual levels.
Step 1
In a nutshell Magic Lantern:
It disables AGC and provides manual gain controls for your microphone.It shows an audio level meter so you can see how loud your input itIt provides headphone monitoringAdds zebra stripes so you can visually see clippingAdds the ability to use rack focus. You set the beginning and end focus point and let it ramp the focus, allowing a smooth focusing effect. It can also shoot a series of photos in varying focus points. You can then put them together using Photoshop CS4’s Exposure blend.Lets you set multiple exposures that I plan on using for bracketing with HDR, it allows up to 9 different exposures vs the 3 in Canons AEB.
Step 2 Best audio:
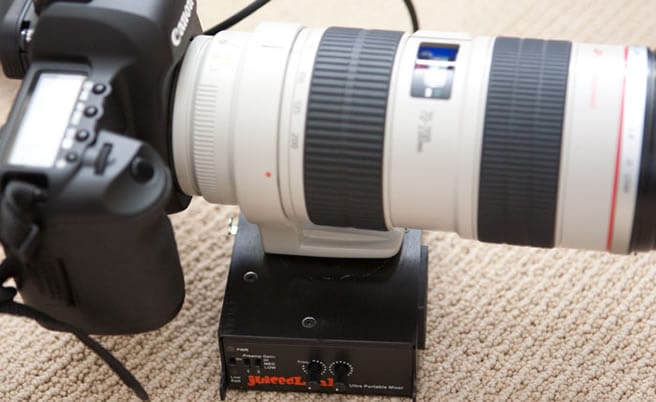
I got the juicedlink CX211 for $189. This is a pre-amp that connects to the tripod and to the camera through the tripod mount. It’s light weight and uses a 9vt battery. By turning down the gain on the 5D with magic lantern and using jucedlink to boost the sound, you get a very clean signal. You also get 2 XLR inputs and phantom power. Audio problem solved!
Step 3 Installing Magic Lantern
First up you need to know that this is installed at your own risk. It could damage your camera and there is no warranty. In it’s current release 0.1.6 it doesn’t support Canon 1.2.4 firmware. YOu need to upgrade from 1.10. I have to tell you, I had a heck of a time finding 1.10 on the web but, I eventually found it. If this link gets broken, you will have to google it.
Step 4 Update Firmware
First update the canon firmware if you need to. (This also has some nice fixes for the exposure during video recording).
Format a CF card,
copy the firmware to the root of the card
put it into the camera.
turn on camera
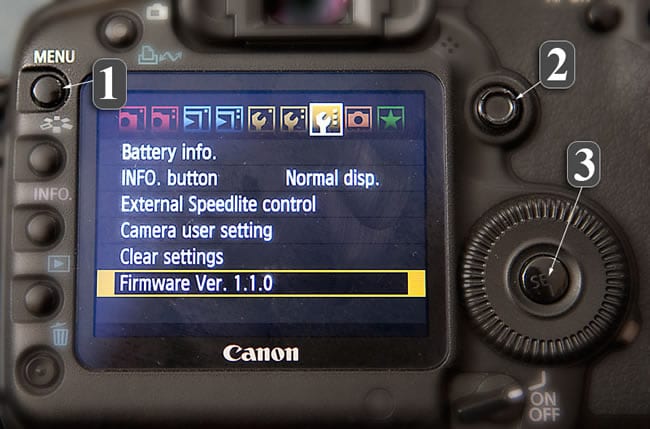
hit menu (1)
move across to the 3rd yellow wrench and navigate to Firmware Ver. (2) (If it’s already at 1.1.0 you don’t need to do anything. If it’s a higher number you need to figure out how to downgrade, or wait for the upcoming ML update.)
Press the Set button.(3) Click ok and whatever you do, don’t turn off your camera or touch any buttons while it’s upgrading or you could toast your camera.
Step 5 Install Magic Lantern
Now you have the firmware all up to date, what about Magic Lantern?
Download it here
Unzip it on your desktop
 format a CF card
copy the magiclantern.fir and cropmarks.bmp to the root of your CF card.
Follow the above steps for the firmware update.
You can now use ML for this session.
Step 6 Using Magic Lantern
You will need to enable Magic Lantern each time you turn on your camera and want to work with video. I marked a CF card with the letters ML, so I know which one to grab.
You need to be in Live View mode for ML to work
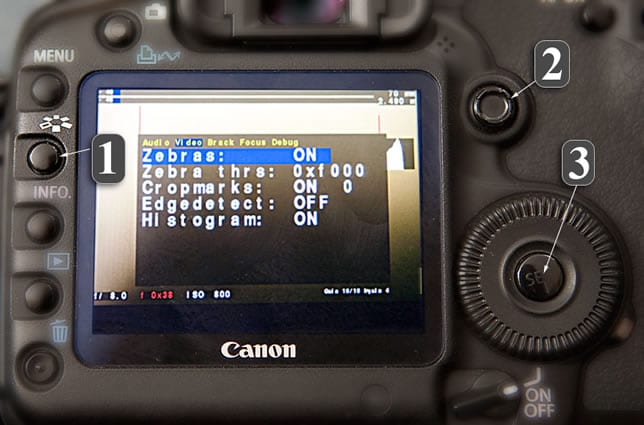
The buttom right under the menu button will become the Magic Lantern menu button (1). The menu is in yellow and is navigated with the the same buttom you use for normal menu navigation (2). Enable choices with button (3).
Step 7 What’s on it?
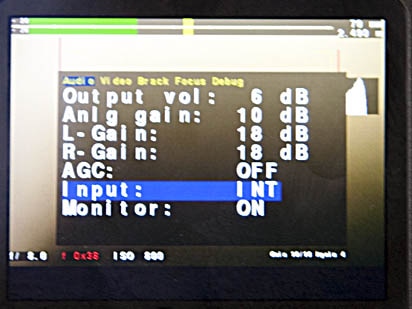 Audio. You now have control over the recording levels, output levels to headphones.Switch between and external and the internal microphone. You will aslo notice the useful audio meters at the top of the display. Why Canon never added these features is a mystery to me.
Step 8
Video enhancements. You can make your own cropmarks file and save it as a bmp.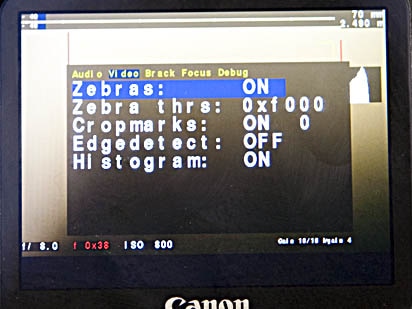
Step 9
Advanced focusing options ,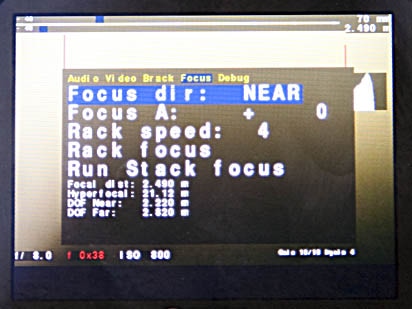
Step 10
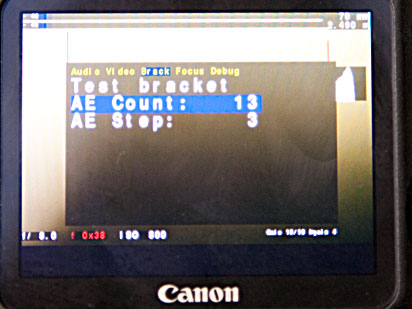 Bracketing
You can set up to 13 different braketed shots. These can be from 1/3 stop incerements all the way yp to almost 3 stop incements. More than enough to cover the entire dynamic range of any scene. This is an HDR lover’s delight!
Email:
PS Don’t forget to follow us on Social Media for more tips.. (I've been posting some fun Instagram and Facebook Stories lately)
You can get my free Layer Blending modes ebook along with dozens of exclusive Photoshop Goodies here

2 thoughts on “Override the video limitations on the Canon 5D mk2 for better video shooting”
Leave a Reply
How to colorize white or black. Quick steps to change white or black areas into color with ease.

Differences between Flux Kontext Pro and Nana Banana in Photoshop, which is better?

You can pull the viewers eye into a portion of a photograph by simulating an in-camera zoom effect. This zoom...


Thanks for this! Can I also use only the video function (and not record audio) since I’m working with a seperate mic and recorder for that?
any idea how we can use the hdmi out to port to a video switcher and keep the bloody mirror up for as long as we want to?