Making a Filmstrip from Scratch Photoshop Tutorial
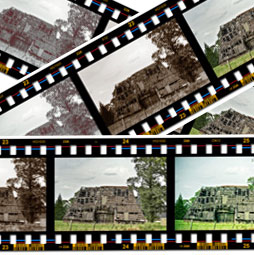
Tutorial by Hermie
Step 1
To create a filmstrip, we will use an original filmstrip for the dimensions. For this tutorial I will use cm (centimeters) for my dimensions.
Create a new document, width 20cm and height 5cm @ 300 pixels/ inch (you can always make the image smaller NEVER bigger, so start big!). In this tutorial we’re going to make use of guides. We want these to be in cm so use CTRL+R to show the rulers. Right click somewhere on the rulers and select Centimeters.
We need a guide line on 0.5 and 19.5 cm vertical and 0.75 and 4.25 cm horizontal. For me the easiest way to do that is to go to VIEW => New Guide… Just fill in 0.5 cm (use also the cm or else you’ll get px and we aren’t using that at this moment). This way we don’t make the filmstrip too big or to small but perfectly to the right dimensions. Do the same with the rest of the guides.This way we get the guidelines on the perfect spots, which we need!
Step 2
Make sure we have black as our foreground and white as our background color. (Press the D key)
Grab the Rectangle Tool, make sure you have shape layers selected (we want to make the layer more editable) and create the rectangle needed for the filmstrip shape.
Step 3
We need two more guides. Put one on 0.6 cm vertical and the other at 0.95 cm horizontal.
Let’s make the sprockets: Grab the Rounded Rectangle Tool and under the options (the little black arrow on the left side of Radius) change this to fixed size and the dimension to 2mm and 3mm (width and height). Use a radius of 3px.
Click once in the overlap of the guidelines and press CTRL+BACKSPACE (Cmd+Del) to fill it with white (if it’s not white already).
Step 4
We need another guide line, this time at 19.4 cm vertical (VIEW => New Guide…).
Now here’s the tricky part, so pay attention and read carefully!
Zoom in for a better view… With the Path Selection tool, click on shape 2. Press CTRL+ALT+T (free Transform), press and hold the ALT and SHIFT then mouse click in the rectangle. Drag the shape to the right (place doesn’t matter, I’ll explain later) and press the ENTER key on the right side of your keyboard (NOT the one under the backspace, this keeps the selection).
Press CONTROL+ALT+SHIFT+T 39 more times and see what happens. (Transform again command) Make sure you have 40 white little rounded rectangles before you press the ENTER key again.
Step 5
The next thing we are going to do is align the rounded rectangles. With the Path Selection Tool, click on the last rectangle (in my case number 40). Press and hold the SHIFT key, now click and drag the shape to where it hits the overlap of the guidelines on the right side of the image. Make a selection around the rounded rectangle (all of them).
Step 6
In the option bar, click on the Distribute Horizontal Centers (second icon on the right) and see what happens! Isn’t this great?
Step 7
Another guideline is needed to position the bottom sprockets: (remember we want it to look as original as possible), this time on 4.05 cm.
Let’s copy the sprockets to the bottom: Duplicate Shape 2 (CTRL+J) and make sure the move tool is selected. Now press the SHIFT key and hold down the arrow key (pointing down) to move it to the guideline. Using the SHIFT will move the layer 10px at a time.
Step 8
Time for the frame dividers: This time we need 4 more guidelines. The first on 1.35 cm, the second on 3.65 cm. The third and fourth we have to do by eye. Zoom in between the 8th and 9th rounded rectangle (I zoomed in at 1600%!) and place the third guide line behind the 8th rounded rectangle then guideline number 4 should begin on the 9th rounded rectangle.
Step 9
Use the Rectangle Tool and make a rectangle shape using the guides we just created. With the same technique we used on the little rounded rectangles, we copy and move the shape when it hits guideline number 4 from the earlier step.
So with the Path Selection Tool, click on the rectangle. Press CTRL+ALT+T (free Transform), press and hold ALT and SHIFT then mouse click in the rectangle. Drag the shape to the right where it snaps to the guideline and press the ENTER key on the right side of your keyboard (NOT the one under the backspace, this keeps the selection).
Press CONTROL+ALT+SHIFT+T 3 more times and see what happens. We now have 5 white rectangles all on the same spot and in a nice line with the rounded rectangles. Now press the ENTER key again.
Step 10
So far we have the basic shape for our filmstrip and it fits perfectly. All we have to do now is to dress it up.
Use the Type Tool to add the numbers and letters. Look very closely to your own filmstrip, if you are using that one. In the early days of photography I used a lot of FUJI 1600 film to shoot my concert photos. Use the image belowas a reference to put everything in place if you don’t have a filmstrip of your own. I used Arial Bold 5pt for the bigger numbers (21, 22, 23, etc.) and the same font but 3pt for the smaller numbers (21A, 22A, 23A, etc.). For the words HG1600 etc. I use Arial Regular 3pt, the color is #E9AB17, a nice golden color.
Use the Line Tool to make the little arrows next to the smaller numbers. In the Option Bar select 1 px for the Weight and next to it click on the little black arrow and select End where it says Arrow Head. Use 10% for the Width and 10% for the Length, leave Concavity to 0%.
Step 11
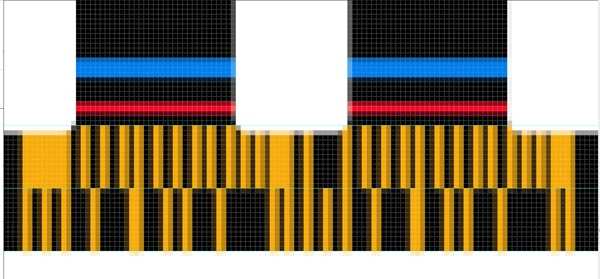
On the original filmstrip I noticed some blue and red lines, so let’s make them here too. Select a nice red and blue color for the foreground and background color. I chose #ED2619 and #1781E9. Use the Line Tool and remove the arrow head in the Option Bar. Just draw a 2 px straight line (use the SHIFT) from one end to the other and press ALT+BACKSPACE to replace the color with the red one. Place this layer under the Shape 2 layers and above the Shape 1 layer. Move the line in place if necessary
Duplicate this layer (the red line) and move it up so it fits the upper rounded rectangles. Next are the blue lines. These are smaller but thicker. Draw a 4px straight line, start in-between the 4th and 5th rounded rectangle then move (when holding SHIFT) to where the 9th rounded rectangle starts. Duplicate this layer and move it to the right so it starts between 12th and 13th then ends before the 17th rounded rectangle. Duplicate it again and move it on the same spot, but this time under the third rectangle. Duplicate it 2 more times so the 4th and 5th rectangle has one too. The last blue line needs to be a little shorter. Select it and press CTRL+T (transform) and shorten it. Duplicate all the blue layers by selecting them and move them to the upper rounded rectangles. Use the image below as a reference.
Step 12
Next we going to make barcodes and this is very time consuming, so bear with me. First we need 2 more guidelines, this time on 4.03cm and 4.14cm Horizontal.
Use the Line Tool (gold color #E9AB17) and draw a 2px line from the bottom of the filmstrip layer to the guideline we made on 4.03cm. Duplicate this line and move it 3px to the right, duplicate that layer and move it 3px to the right. Repeat this so you have 21 lines next to each other. Look closely, you’ll notice I sometimes moved the lines just 2px to the right. After that, shorten the lines to the guideline in the middle of the lines (that’s 50%). Create this barcode or create your own. I also needed a small rectangle to combine some lines. After that duplicate this barcode and move it to the right so you have one bigger barcode
Step 13
This of course all in a group so that you can duplicate the group to create more barcodes on the bottom of the filmstrip. I used a total of 10 barcodes!
Step 14
The next thing to do is make the background layer invisible by clicking the eye next to the layer. Select the top most layer and press CTRL+ALT+SHIFT+E to merge all the layers into one single layer on top of the other layers. Hide all other layers too and make sure the merged layer is selected. CTRL+click the Shape 2 layer. This creates the “marching ants” around the rounded rectangles and press delete to remove the white rounded rectangles. Press CTRL+D to deselect. Do the same with the Shape 2 copy layer. If you want a shadow behind the filmstrip then go to the Layer Styles and create one with Drop Shadow.
Step 15
The last thing we need to do is to add some photos.
Open a photo you like and press CTRL+A (this will select to whole photo) then press CTRL+C (to make a Copy). Go back to the filmstrip, use the Magic Wand Tool and click once in the first white area where you want the photo to be (this will select that area). Go to EDIT => PASTE INTO and the photo is there. Resize it so it fits the area. Do this 4 more times and the filmstrip is done!
PS Don’t forget to follow us on Social Media for more tips.. (I've been posting some fun Instagram and Facebook Stories lately)
You can get my free Layer Blending modes ebook along with dozens of exclusive Photoshop Goodies here

One thought on “Making a Filmstrip from Scratch Photoshop Tutorial”
Leave a Reply
In this tutorial we will share some techniques how to shoot and retouch for a high-key effect in architectural photography....
Macphun Tonality Pro Plugin for Photoshop. Feature walkthrough and review on Photoshop and Lightroom Plugin, Tonality Pro from macphun
Here is a nice little tutorial to show you how to electrify your images with lightning in Photoshop. This spooky...









Thanks, well explaned and I learned some new tools.