
Collaging in Photoshop Photoshop Tutorial
Step 1

 You know the drill by now, make a new document and drag and drop both images into the document. Create a new layer for the back ground and fill with white. (I know its black on the pix, but I changed my mind later)
Select the top layer (by clicking on its name in the layers palette)
Click the add layer mask icon ![]() in the layers palette to add a mask to the hands layer.
in the layers palette to add a mask to the hands layer.
Step 2
![]() Make sure the mask is selected, you can tell because the icon will show a square with a circle in it. (See illustration) (CS USERS: They removed this icon on CS2 The top of the status bar will say mask)
Make sure the mask is selected, you can tell because the icon will show a square with a circle in it. (See illustration) (CS USERS: They removed this icon on CS2 The top of the status bar will say mask)
 Making black as your foreground color, choose the brush tool and a large soft brush.
Step 3

As you begin to paint, notice how the top image dissapears as you paint it out. On a layer mask, whatever is painted black is made invisible. Whatever is white is visible.
Step 4
 Once we have painted out all the parts we want hidden, you may notice some areas where you over painted. Don’t worry.
Step 5
![]() Press the “X” Key to switch the foreground and background colors. With white as the foreground, choose a smaller brush and paint back the areas you want to keep. Notice as you paint with white, the
Press the “X” Key to switch the foreground and background colors. With white as the foreground, choose a smaller brush and paint back the areas you want to keep. Notice as you paint with white, the 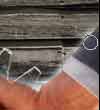 image comes back. Don’t you love layer masks!
Step 6
 Now are you ready to take the next step? Duplicate layer 1 (The cog), by selecting the layer and layer>duplicate or by simply dragging the layer name to the new layers icon.
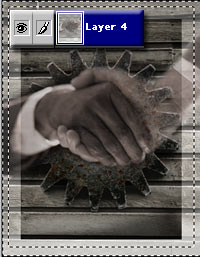
Drag the new layer to the top of the layers palette as seen in the picture.
![]() Keeping the top layer selected, Ctrl/Cmd+click on the layer 4 thumbnail (The tiny picture of the hands in the layers palette)
Keeping the top layer selected, Ctrl/Cmd+click on the layer 4 thumbnail (The tiny picture of the hands in the layers palette)
Step 7
 A) You should see the “marching ants” selection like this
![]() B) Click add layer mask
B) Click add layer mask ![]() and the selection will automatically fill the mask. Click the mask thumbnail to select the Layer Mask.
and the selection will automatically fill the mask. Click the mask thumbnail to select the Layer Mask.
C) Invert the mask by pressing Ctrl/Cmd+I or image>invert.
You will now see the hands again.
Step 8
 We are going to paint back some of the cog. But to see it clearly we will lower the opacity of the hands layer (layer 4) Select the layer and slide the opacity to 58%.
Step 9
 Select the top layer again. Just like before, with the layer mask active and a white brush, paint the edges of the cog to make then visible.
It will help to use a smaller hard brush for the detail in the teeth of the cog. Use a large soft brush going into the hands for a smoother transition.
Step 10
 Put the opacity at 100% again on layer 4 (the hands layer) There we have an interesting blend of images.
Are you ready to take it even futher? Lets go…
Step 11

By now if you have done the other tutorials on photoshopcafe.com you will be very familiarwith my colorizingtechnique.
Go to hue/Saturation and colorize the hands with a warm color and very little color saturation, 30% at most.
Pull back the opacity on all the layers to 70 – 80%
Click on the “hands layer” thumbnail to select it. then directly to the left of the other thumbnails, click the box and see the little “chain” icon appear. This means the layers are linked. Link the 3 layers together, do not link the color background layer. Go to Layers>Merge linked.(CS2 Users: Hold Down Cmd/Ctl and click each layer to select it. Choose Merge Layers From The Palette Options Menu)
You now have only 2 layers. The composite layer with our art and the white background layer, let’s do something cool and fun…
Step 12
 Select the white layer “layer 3”
With the retangular marquee tool “M” draw a smaller rectange inside the picture frame and fill with black. Should look like at the left.
Step 13
 Select the top layer and make another rectangle larger than the last one
 Invert the selection by pressing Ctrl+Shift+I orMac Cmd+Shift+I
Select>feather input about a 10 pixel feather 
12
 Press delete 3 times and this is what we have.
13
 To finish off I have added some type in Screen mode.
Photoshop VAULT
Access valuable Photoshop extras and goodies for free and much more a
PS Don’t forget to follow us on Social Media for more tips.. (I've been posting some fun Instagram and Facebook Stories lately)
You can get my free Layer Blending modes ebook along with dozens of exclusive Photoshop Goodies here

4 thoughts on “Collaging in Photoshop Photoshop Tutorial”
Leave a Reply
How to edit a photo and give it a fine art, painterly effect in Photoshop.

How to automatically combine multiple images into a single image in Photoshop.

How to use the new features in Lightroom 10, color grading, tethered capture and new zoom


I am excited to explore and learn more. First and foremost I am an artist with a background in drawing , painting, sculpting and photography. I have discovered that what I really like about the photography is altering the image. For me this is where the creativity is unleashed. I have so much to learn in photoshop, Lightroom etc.
One question, since I can not read everything at once are the articles archived. Is there a library to access articles that are no longer considered new?
All the tutorials are on the site. You can browse by topic or search in the search bar.
STEP 7 – C
Invert selection is CMD SHIFT I?
yes on mac, Ctrl+Shift+I windows