
Texturing Type Photoshop Tutorial

Texturing Type
Al Ward, Action Fx Photoshop Actions Resource
Hello Colin and denizens of the PS Café! Sorry for the horrible delay in sending this column/article/tutorial. I could spout a dozen excuses for not posting in awhile, but they all sound weak as I recite them to myself. I do a lot of that. 😉
I’ve been playing with what I consider a pretty incredible feature in Photoshop, and thought this week I’d share it with you.
Photoshop has a very powerful addition to the Layer Styles that is grossly overlooked, but if you are into dynamic typography, interface design or realistic effects for your creations, mastering the Pattern Overlay feature is a must.
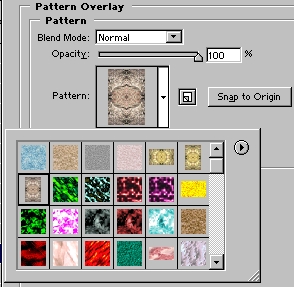
The process of creating patterns is fairly simple, and will be covered in depth in the Planet article. Basically you simply find an image you think would be a good texture, define it as a pattern, and then it is yours to apply as needed.
For example (don’t you just love examples?), I’m wading thru endless images on a clipart disk set, wondering what possible use I can get out of 500,000 images. Then I notice… drum roll please… an entire section devoted to industrial photos! Metal sheets, buckets of nails, rust, chrome, you name it. What if I took advantage of my pattern defining tool and applied these images to my designs? Actually I’ve already done this and, as the cool factor turned out to be pretty high, this article was (is being) born.
1
As stated before, the actual process of defining these textures will be covered in another article, but let’s take a look at some effects we can create using this process. I’m starting with simple white type on a black background.
This is just to give our image some contrast… use any background you see fit.
Ok, let’s apply some of my new textures to the type.

2
Ok, once this is loaded into the textures drop down, all you no do is select Texture Overlay from the Layers Palette and select the pattern you would like to use to overlay your design.
Here’s the result just from applying this texture:

Photoshop has made the process so incredibly easy, you will no doubt be creating your own textures in no time.
3
Hmmm… there must be more we can do to this type though. What about applying more layer styles to the textured image?
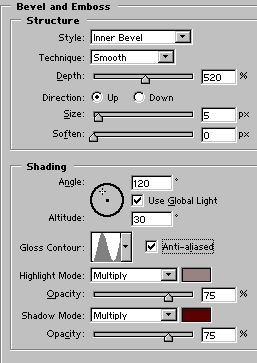
First, a bevel:
Duplicate the type layer, and select the original (the one not on top).
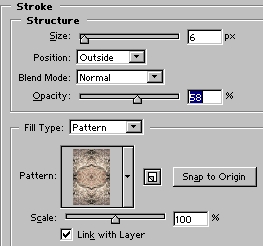
Let’s apply a patterned stroke to this layer:
4
Create a new layer beneath this layer, select this layer again and Command/CTRL+E to merge down. Apply another bevel:
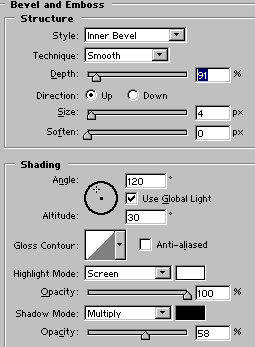
5
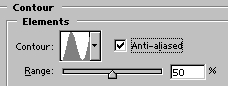
Now apply a contour to that bevel:
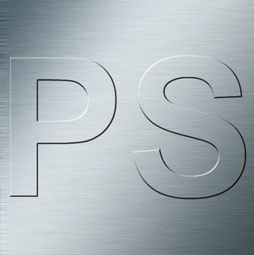
Here’s the result of my little experiment:

6
Just play around with it to get a feel for it. Here’s what I came up with in about a minute:

That’s it for this time around.
Al Ward, Action Fx Photoshop Actions Resource
This tutorial was written by my friend, Al Ward from Actionfx. Unfortunately, Al passed away a few years ago, RIP Al!
PS Don’t forget to follow us on Social Media for more tips.. (I've been posting some fun Instagram and Facebook Stories lately)
You can get my free Layer Blending modes ebook along with dozens of exclusive Photoshop Goodies here

2 thoughts on “Texturing Type Photoshop Tutorial”
Leave a Reply
In this Photoshop tutorial Im going to show you how to make a stamped metal effect. This is similar to...

New Dust removal in Photoshop ACR automatically removes dust and spots from photos

Amazing Adobe AI Photoshop 1-click Season change on your photos, how to use Landscape mixer


What happened to Al Ward… he shut down action fx long ago… he took my money … you say create don’t steal… well he stole from me and many others
Sadly Al passed away a couple of years ago and is no longer with us.