
Learn HDR in Photoshop, Colin’s HDR photography tutorial

I originally wrote this tutorial for Photoshop CS3, in the years since then, Photoshop has gotten a couple of big upgrades in the HDR area, and we are now at Photoshop CC. I have also learned a great deal more about the subject, so I decided it was time for an update.

What is HDR and why do we need it?
I n this tutorial we will take a look at HDR photography. HDRI (High Dynamic Range Imaging) was originally used in 3D and is now in full force in photography. Basically it’s the process of taking multiple exposures and merging them together into a single 32 bit image. Let me explain:
Watch the HDR Intro video that explains what HDR is
A camera is capable of capturing a limited amount of tones in a single photo (we call this dynamic Range, the range of tones that can hold detail between pure black and pure white). Typically we sacrifice elements in a photo when we set the cameras exposure. We meter for the most important part of the scene. For example let’s look at the series of images I shot at the Bradburry building in Los Angeles. The center image is a typical exposure, showing an average metering to produce the most detail possible. Notice that the detail outside the door is lost because it’s too bright. Also the detail on the stair rail is lost because it’s too dark. When you are at the location, you are able to see all these detail with your eye, this is because the human eye can see a larger range of tones than the camera can capture on the sensor or film in a single photograph.
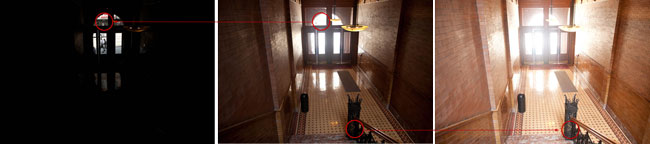
The solution is to take more than one photograph and bracket the photos. Shoot a normal exposure (center image), then under-expose (left) to capture the highlights outside the windows and over-expose (right) to capture shadow detail. Finally, merge these photos together to produce a single image with a larger range of tones that can now show all the details in the shadows and highlights.
This tutorial will show you how to complete this process with the minimum fuss.
This tutorial will work for all versions, including CS6 and HDR in Photoshop CC. In Photoshop CC Camera Raw was added as an option, and Lightroom 6/CC can now merge HDR more about that here too.
I have also just added a tutorial on HDR in Camera Raw (Photoshop CC 2015) (See bottom of this page for an updated HDR resource list)
Tips for photographing HDR
First we need to capture our source images with our camera. Technically you will need to shoot a minimum of 2 photos with different exposure settings to create a HDR. I personally get good results from 3 shots. I like to over expose and under expose by 2 stops each. I know this is a bigger bracket than some people are comfortable with, but for the type of HDR images I like to create (cityscapes), this works great. If you’re shooting people, you may want to reduce this to single stops.
Sometimes you need to capture more than 3 exposures. It really depends on how much contrast is in your scene. For the example of the Bradburry building, I captured a series of Photographs inside a dark building in Los Angeles with a sunny day outside a glass window. I needed 7 photots with 2 stops apart in order to capture the entire dynamic range of that scene. You might be able to capture a lower contrast enviroment such as a foggy day in a single frame. But once again, for the majority of HDR photography 3 shots are usually perfect. I set the camera for Auto Exposure Bracket and 2 stops + and -. Make sure that you only change the shutter speed. If you change the aperture, the depth of field will also change, producing unwanted blurring in your final composite. Use a tripod if you can, otherwise support yourself on a wall or solid object to reduce movement between frames.
Note: For real HDR, you shouldn’t use a single raw image and exposure it several times as some people suggest. This is unnecessary, as you can use the Shadow and Highlight recovery and adjustment brush in Camera Raw or Lightroom to bring out the same amount of detail in the photo. Also there has been misinformation circulating, using the term “Single Image HDR”. This is known as pseudo-HDR. You can’t get HDR (HIGH Dynamic Range) from a single SDR (STANDARD dynamic Range) photo. It’s like “single speaker stereo”, the digital informaition just isn’t there. You can apply a tone-mapped effect to a single image for a grungy feel. It’s psudo HDR, but not to be confused with true HDR.
HDR in Photoshop tutorial
Step 1
Start with 3 images. One normal exposure, the second underexposed and the third overexposed. In this case I used 2 stop bracketing. As I shoot a lot of city scapes I can get away with 2 stops, because I’m mainly shooting flat surfaces and banding and posterization isn’t such a problem. If your shooting rounded and curved surfaces you will want to lower your bracketing to get smoother gradients, although there is a lot of overlap already in the tones as a decent DSLR camera can capture around 11 Stops of exposure.
I set the bracketing on my camera to 2 stops. Then I set the shooting mode to burst. When I hold the shutter down, 3 photos will be captured. I shoot in the RAW format for the widest possible dynamic range. You can still create HDR if your camera doesn’t support RAW, but bear in mind a jpg is only an 8-bit file.
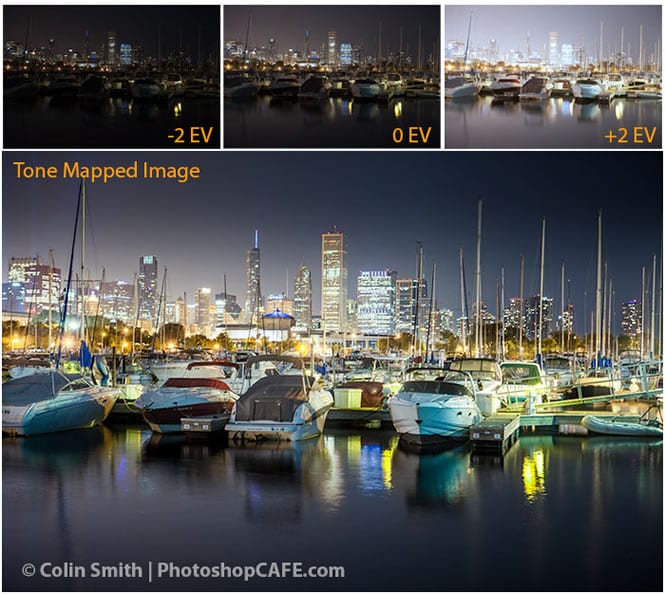
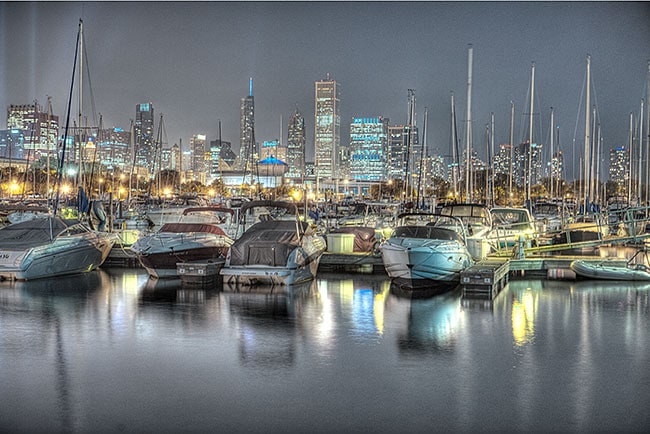
Make sure you shoot in Aperture Priority or in Manual. You want to bracket the exposure time, not the Aperture. If you change the aperture, the depth of field won’t be consistent and you’ll get blurring. Also avoid any moving subjects in the photo or you’ll get “ghosting” where something is only in one frame and will appear very strange in the final. If you look at the three image that I used here, the middle image has a lot of detail. However, the details in the shadows are lost in the boats and the city lights are too bright and lose detail information. The left image is under exposed to pick up the details in the highlights such as the buildings in the background. The right hand photo is over exposed by 2 stops to pick up the detail in the shadows, such as the hulls of the boats and water reflections.
Step 2
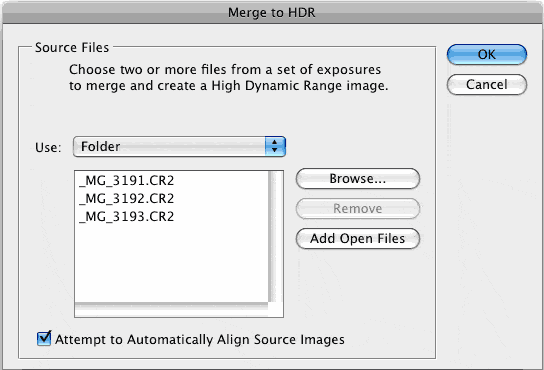
Time to merge the photos together into a single 32 bit image. (Note: You can now do HDR in Lightroom 6/CC, tutorial here)
Choose File>Automate >Merge to HDR Pro. This works on Photoshop CS2 – CS6 (CS2 Doesn’t have auto align and it’s called “Merge to HDR on versions older than CS5). Choose either images or folder. I organize each set of photos in its own folder so I used the folder option. Select your photos to merge. Turn on Auto Align in Photoshop CS3+. Click OK. (Photoshop uses Auto-align technology that even allows you to create HDR without the use of a tripod!)
Step 3
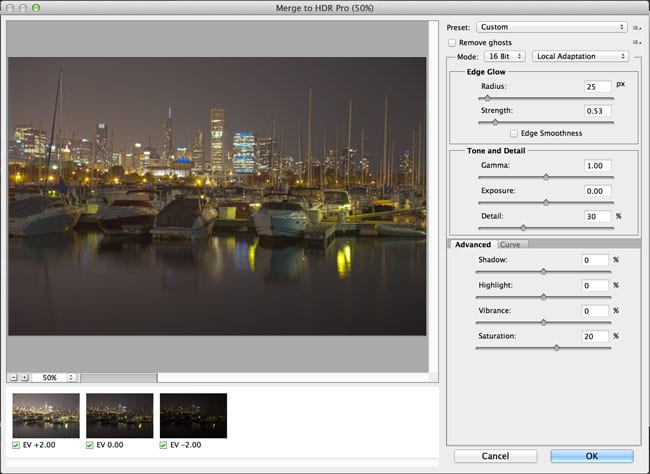
Your images will now be merged into a single photo. You can turn off individual photos by un checking their boxes on the left filmstrip. If you get some blurring caused by camera shake in the longest exposure, you may want to turn off that photo. If there is ghosting because of movement, click the box: Remove Ghosts.
(When the mode is at 16 or 8 bit you will see settings like this, if 32 bit is selected, it will look like step 4)
Step 4
The merged result is a floating-point 32 bit image. Change the mode to 32 bit. You can view the available tones by sliding the White Point slider. Note, this slider doesn’t change the image, it is there for you to examine the range of tones, because a monitor is incapable of displaying all the tonal detail in a 32-bit file all at once.

Note: In Photoshop CC there is a new option. “Complete Toning in Adobe Camera Raw” This option isn’t in CS6. If you are on Photoshop CS6 and lower, jump to step 5 right now.
If you are on CC and the “Complete Toning..” button is turned on, you won’t be able to move the slider. Click the option off and you will be able to move the slider and continue with the rest of the tutorial just like in CS6.
However, when the option is turned on, you will be able to use Camera Raw for the Tone Mapping instead of the HDR Pro settings. In this case, skip to step 8b.
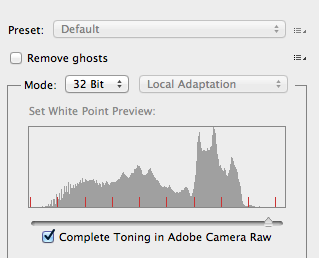
However, I recommend learning both methods as they each have merit. The HDR Pro tone mapping (step 5+) will give you more control and enable you to create a surreal effect as well as powerful HDR controls. ACR (Camera Raw) has the advantage of being able to do very realistic HDR tonemapping without too much effort.
Step 5
You could do your tonemapping right now if you like, but I like to save a 32bit negative. Click OK to merge the photos into a 32 bit image. Now is a good time to save your file. Save as a psd, tif or open EXR.
If you are working with 3D and are wanting HDRI for IBL lighting, enviroments etc, save as open EXR as Maya and other 3D packages recognize this format. (you are finished here, photographers read on).
Step 6
In order to use the photos, you’ll need to convert them to 16 or 8 bit images. When we convert them we will create what I call interpretations of the photo. The reason I say this is because we have unlimited ways we can make the photo look. While we have this huge dynamic range available in 32 bit, we will no longer have those options after conversion. Always work from the saved 32 bit version, and then convert and save versions (personal interpretations). Avoid overwriting the 32 bit image, it’s our master and we may want to go back to it many times.
Choose Image>Mode>16 bit (or 8 bit). Now we get to play with some fun options. You’re now at the tone mapping part of the process. This is were all the creativity can ooze.
(If you want to make the adjustments without converting, choose view>32 Bit Preview Options. You can use several of Photoshop’s tools in the Image>Adjustments menu. The most important of these is the Exposure control)
You’ll see an HDR Toning Dialog box (HDR Conversion for versions before CS5). Exposure and Gamma is the default option. Best way to approach this? Set the gamma first, then adjust the exposure to suit. If you want an image with lots of contrast, lower the gamma. For less contrast raise the gamma. Finally, adjust the exposure to get the desired brightness. If you want more control, read on… otherwise press OK to convert.

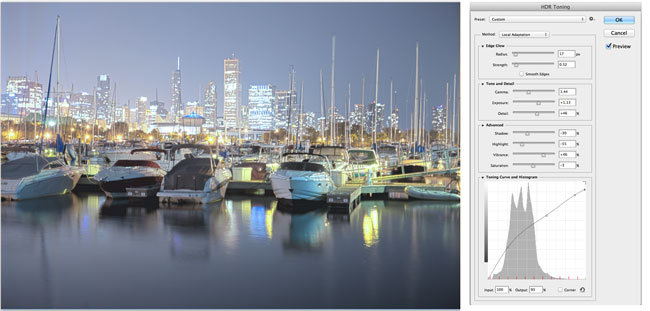
Step 7
Change the Method to Local Adaption. (There are 4 available methods, but these are the only 2 with user input).
With local Adaption, you get some advanced Tone Mapping sliders and you can adjust the curves. The use of curves is optional as they allow you to fine tune the other settings. Set these like you would normally work in curves, but don’t be afraid to clip the histogram a little. You can clip because you’re working with a larger dynamic range than you’re used to. Bring out the detail in the image, but don’t forget to put some shadow in there or it will look washed out and fake.
Edge Glow
Once your happy with the curve, adjust the radius and strength sliders to make sure there are no halos in the photo. (Badly converted HDR images have a glow around the areas of contrast.) The radius controls the mask blur while the strength decides how strong to apply the effect.
Tone and Detail
Gamma: This is where you control the contrast. Extremes are washed out or super punchy.
Exposure: Controls the overall brightness.
Detail:This sharpens or softens the appearance.
Advanced
Shadow: Opens up details in darkest parts of the photograph.
Highlight: Recovers detail in the brightest areas of the photograph.
Vibrance: This makes the photo more colorful without over saturating areas that are already colorful. (It’s smart).
Saturation: Increases or decreases the overall amount of color. Be careful not to over saturate the colors as a rule. (Of course all rules can be broken on occasion).
Click ok to convert.
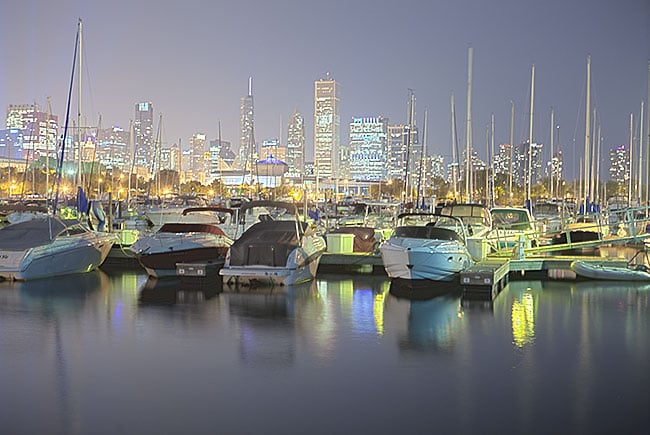
Step 8
Here we have a merged image from HDR. Photoshop is great for producing very realistic HDR images.
Step 8b
HDR, Lightroom and Camera RAW, (Photoshop CC)
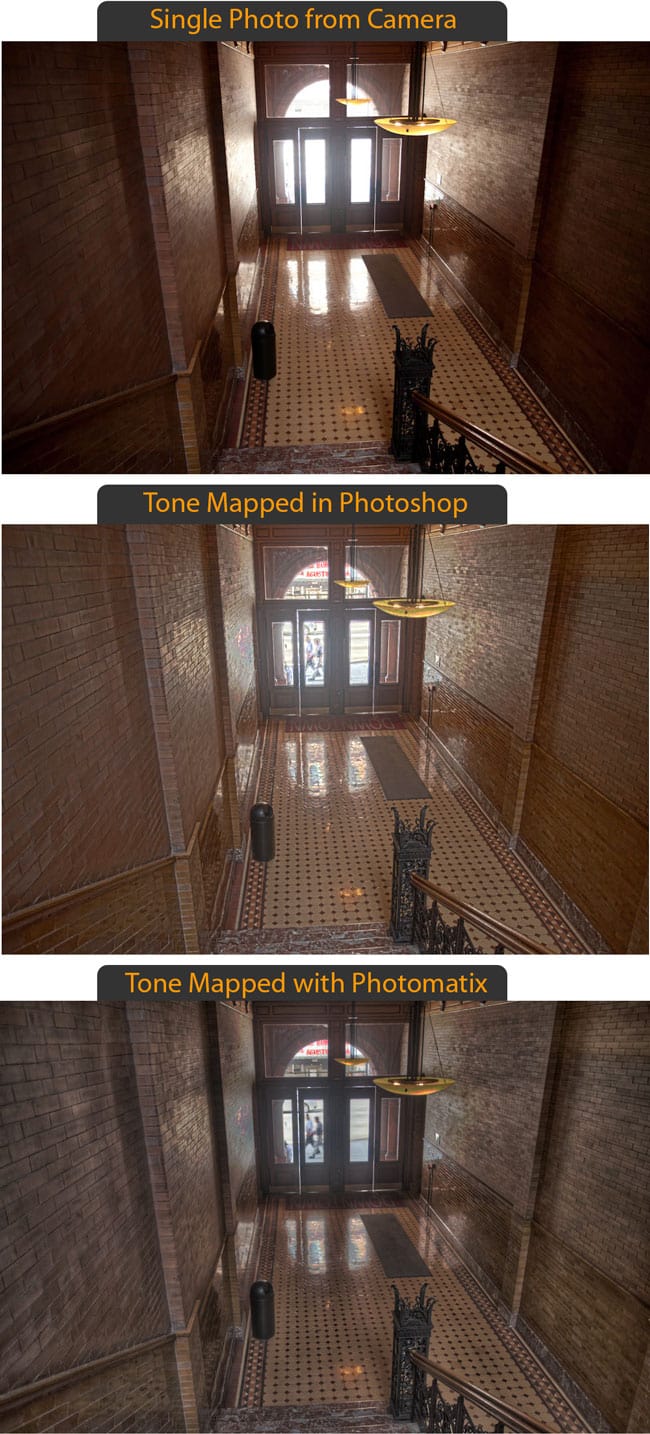
A new development in the latest release of Lightroom. 4.2+ and Camera Raw in Photoshop CC, is the ability to work with 32 bit images. This is wonderful because you can use the adjustment brush to fine tune areas of the photograph while working in a 32 bit enviroment. The image below shows the result of working with the adjustment brush in Lightroom. Notice how I was able to craft the image. (The same is possible with ACR). Read on for instructions…

In step 4, we are in the Merge to HDR Dialog box.
1. Choose 32 bit from the Mode dropdown menu if it is in 8 or 16 bit mode.
2. Turn on the “Complete Toning in Adobe Camera Raw button”. The button at the lower right will change from OK, to Tone in ACR.
3. Click the Tone in ACR button. THe image will now open in Camera Raw. You can perform all the usual adjustments that you would do in Camera Raw, with the luxury of working on a 32 bit HDR image which has much more availible detail in the highlights and shadows.(Take advantage of the shadow and highlight sliders). See ACR Tutorial here
4. Click ok when Finished.
5. The image will still be in 32-bit mode. If you want to do further tonemapping, you can jump back to step 5 of this tutorial and work on your photo with the advanced tone mapping tools in Photoshop. Yes, you can double tone map an image with great results.
If you are happy with the current results and finished working on the tonal adjustments of the image, you just need to convert to 8 or 16 bit and finish off like you noramally would on a regular LDR (Low Dynamic Range) image. Choose Image>Mode> 8 or 16 bit. The tone mapping options will pop up, to keep the appearance exactly as it was in Camera Raw, choose Exposure and Gamma as the Method. Set the Exposure to 0 and the gamma to 1. Click ok and your image is done. Congratulations. (I know there is a lot to it, my 4.5 hour DVD makes it very easy to understand).
Note: If you can’t get the HDR Toning tools to open in Photoshop CC that’s because of a preference seting. Choose your preferences>File Handling. There is an option that says “Use Adobe Camera Raw to Convert Ducuments from 32 bit to 16/8 bit” If this is on, when you choose File>Mode you will see Camera Raw. If the Option is Off, Photoshop will use the standard HDR Toning options.
Lightroom
(More info and free video on editing HDR in Lightroom and/or ACR)
In order to work with a 32 bit file in Lightoom, you must do the following.
 1. Merge to HDR as mentioned earlier in this tutorial.
2. Save as 32 bit file, be careful to save as a TIF, it will only work with a Tiff.
3. Import back into Lightroom
4. Use the adjustments as you would normally, but enjoy a lot more control and larger range of tones than before.
Step 9
If your desiring a more surreal result there are different plug-ins that you can use. My favorite is Photomatix pro from HDRsoft. You can just get the tone mapping plug in for Photoshop which works great.
Using photomatix tone mapping plugin allows you to get highly detailed textures in your photographs. You merge in Photoshop as shown in this tutorial. Then choose Filter>Photomatix to apply tone mapping. Convert and save as normal.
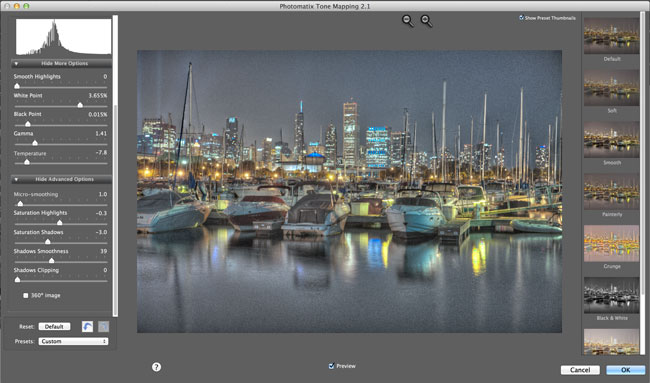
Step 10
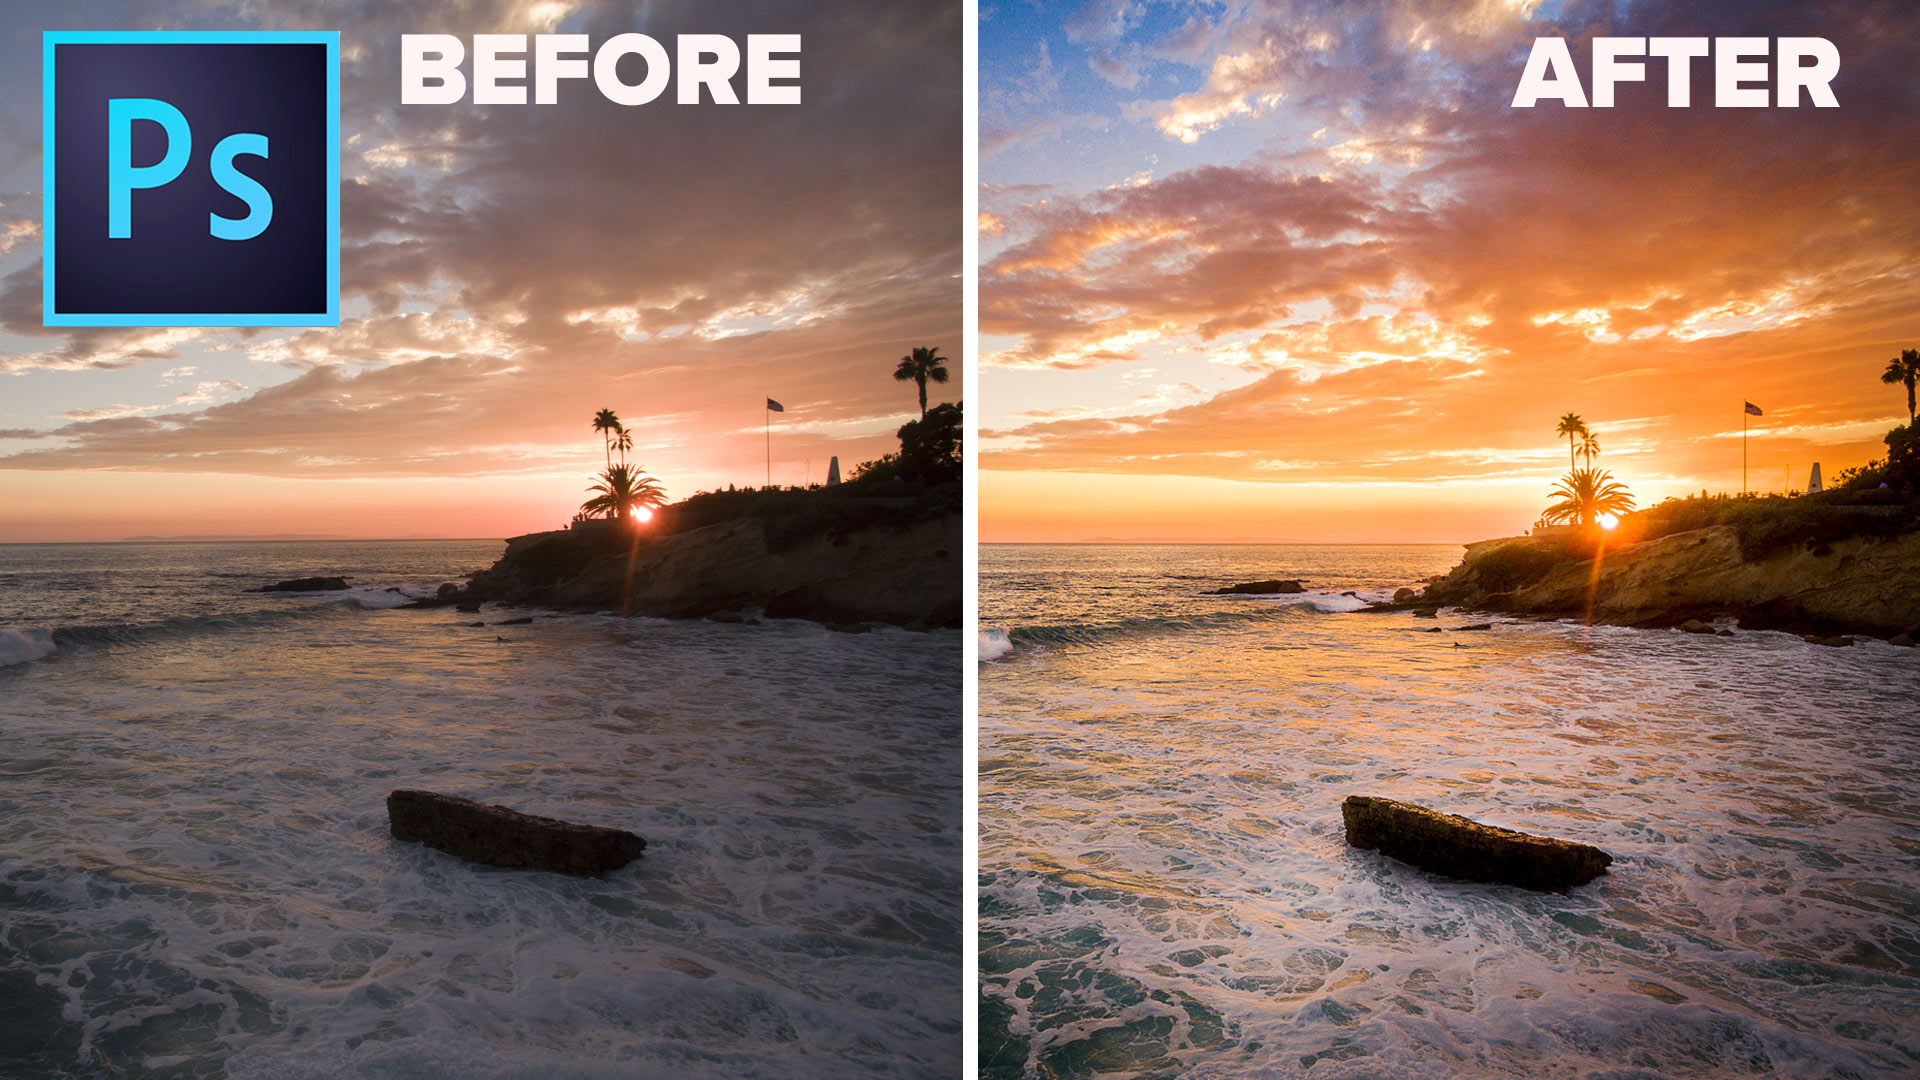
This image shows an image after tone mapping using Photomatix pro.
Step 11
Here you can see comparisons between a single image, subtle Photoshop HDR and a radical Photomatix effect Whatever result your after, hopefully this tutorial has helped demystify the HDR process.
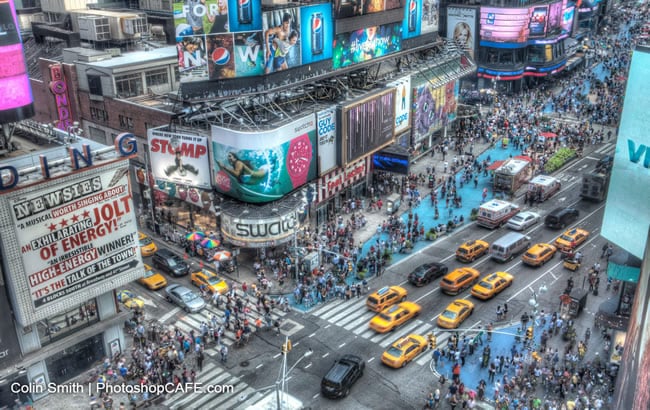
Here are a few more examples of my HDR photography. Check out my Gallery for more

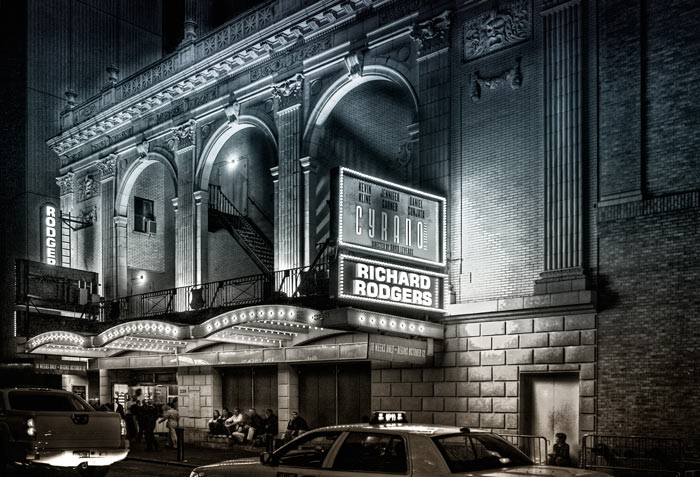
Here is another HDR shot of mine. This is a night scene converted to grayscale.

I hope you enjoyed this tutorial!
Colin
HDR Resources
Check out our free HDR resources at PhotoshopCAFE
- Colin Smith’s HDR tutorial
- My gallery of HDR images
- HDR for Real estate and architecture
- HDR in Camera Raw (Photoshop CC 2015) and quick HDR guide
- Basic HDR explaination (Video)
- Written tutorial on HDR in Camera Raw (What’s new)
- HDR in Lightroom
- Tone Mapping HDR in Lightroom and ACR
Thanks for reading / watching and don’t forget to share these resources with your friends.
See you at the CAFE!
Colin
Extra Resources

HDR | Panorama | Timelapse Multishot Mayhem
This video course takes you through the very latest techniques in HDR, Pano and Timelapse. Colin shows you how to do the entire workflow in Photoshop Camera Raw (works in Lightroom CC too). If you want to create these stunning types of images, this is the place to start. Check it out here
PS Don’t forget to follow us on Social Media for more tips.. (I've been posting some fun Instagram and Facebook Stories lately)
You can get my free Layer Blending modes ebook along with dozens of exclusive Photoshop Goodies here

31 thoughts on “Learn HDR in Photoshop, Colin’s HDR photography tutorial”
Leave a Reply
How to make a photo look like a tiny miniature model in Photoshop with the tilt shift filter. This Photoshop...
How to edit your photos like a pro in Photoshop in 4 easy steps. A free mini masterclass in photo...
I am going to show you an alternative to lightening your photographs. This technique will add depth to your lighting...


Post processing work after taking any photo is always a difficult task to do. But yes the professionals are not worried about this at any point. If the shots can be made perfect before taking the images that would be more worthy for me as I am not so much good at photoshop.
i like every articles of your post. nice!
its very informative post i have learned many things from this post.
Off course I like your post. Great tutorial and techniques well explained.Thanks for sharing.
Hello,
Now a days photography tutorials is very important things for all . I like to design photography however , I’m beginner in Photoshop and i admire you tutorial .
Great Tutorial. Simply like this 🙂
Handsome presentation to the tutorial. I love the post also.
I have an issue with my cs4 that I was hoping someone could help me with. I’ve been doing automate:merge to hdr for a while now but recently when I hit ok, it loads for a few seconds and then creates a white background saying untiltled hdr and doesn’t take me to the next editing page.
This was a good suggestion that you put up here…dude…..hope that it benefits all the ones who land up here.
All 11 steps are very beautiful.
Is this being maintained or updated anymore? 32-bit processing tutorial way out of date with new CC.
Actually, no it isn’t and I could probably spend an hour giving you reasons why it’s not, but in a nutshell… ACR/Lightroom do a good job with DNG merging, but not fantastic with Ghosting, just because something new comes along, doesn’t mean the other ways are obsolete (32 bit is still a better working g place, DNG is faster). The more you know, the more you know.. Now, remember that not all Photoshop users are Photographers. 3D and VFX artists need true 32 bit files for lighting and reflection/texture maps.
All 11 Steps are Fantastic. Hope you will share more.
Lot of Photoshop tutorials I have read on photo HDR merge. I am really impressed to this tutorial. I just want to include one thing “Without excercise, practise and experience, the talent is of no use” and You did it. Thank you.
Absolutely love your tutorials. Thanks so much. Is there a way to download your tutorials so I can put them on my desktop for easy reference?
Occasionally I release some on PDF, if you are on the mailing list, you will receive them when I send them out.
Thank you so much for the making this track for us.
love your tutorials.Hope you will share more.
.I just love your tutorial. Hope you will share more.
how do I photoshop?
Work you way though the tutorials and you will learn
I have a problem with my CS4 with which I was hoping someone could help me. I automated: merge hdr for a while, but recently when I clicked ok, it loads for a few seconds and then creates a white background labeled hdr until it runs dry and leads me to the next edit page.
Your tutorial is amazing. shows everything in details. A complete newbie in HDR photography also do well, if they follow this guide step by step.
nice info thanks
its a great tutorial.. i am a beginner in photoshop.. buy I am very much passionate photo editor .. thanks for the guide
Great tutorials Colin, been watching your PS videos for a while now.
A question regarding HDR workflow .
1. I am using PS CS6 and LR6 with Nikon RAW bracketed files..
2. I import the RAW files into LR
3. I then ‘HDR PRO merge’ the bracketed photos to PS CS6 (creates a PSD)
4. Tweak this PSD further in LR
5. Export to jpeg (FINISHED).
My question is…
When initial doing the merge to PSCS6 in step 1 are all the LR settings in ‘Developer’ and EXPORT settings being sent in the merge?
If yes to the above then when further tweaking in LR (step 4) should i turn off all Developer settings so as not to ‘double up’ o the enhancements.
OR… are the raw files in the merge being sent untouched?
Many thanks
Kevin
love your tutorials, hope you will share more 🙂
Thank you for the valuable post
Wow I have fond lot of content just wonderful
great communications
Nicely explain those steps of Learn HDR in Photoshop. Thanks for sharing!