
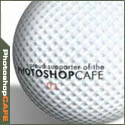
Golf Ball Photoshop Tutorial
This tutorial was created by Greg a number of years ago.
Step 1
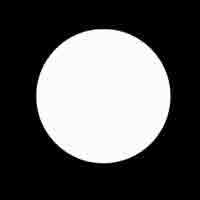
1. Make a new canvas. Here, I used 800 x 800 pixels, 72 dpi, RGB, background white
2. Invert your background to make it black
2. Make a new layer
3. Use your circular marquee to draw a circle and fill it with white

Step 2
 4. Make a new document, 20 pixels x 20 pixels, RGB, background transparent
5. Use your circular marquee to draw a circle and fill it with black
Step 3

6. Edit: Define pattern (call it Dimples)
7. Go back to your original document (Ctrl-Tab) and make a new layer
8. Ctrl-click Layer 1 (the white circle you created) and press Shift-Delete to bring up your Fill options dialogue
9. Select Pattern, and fill with your Dimples pattern
Step 4

10. Press Ctrl-T to bring up Free Tansform and rotate this layer 45 degrees. Press Enter.
11. Filter:Blur:Gassian Blur 2.0 pixels
12. Now Ctrl-click Layer 1, and hit Ctrl-F to repeat the blur
Step 5

13. Filter>Distort>Spherize 100%
Step 6
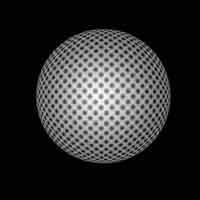
14. Now we’ll finish the map by creating the contour of the ball itself. Press D to reset your palette, press X to invert the colours, and select your gradient tool (G).
15. Select radial gradient, foreground to background and change the opacity to 50%. Make sure your original circle is still selected, and draw a gradient from the center of the circle to the outer edge
Step 7
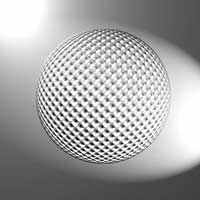
Now we have a successful map to apply lighting effects.
16. Create a new layer, hold down alt, and merge visible. This will be our rendering channel. Select all, copy, create a new channel, and paste.
17. Hit RGB composite, and go back to the merged layer
18. Press Shift-Delete and fill with 50% Grey
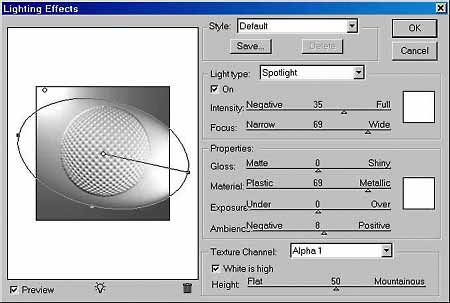
19. Now go into Filter:Render:Lighting effects
Now here’s where the fun begins. you can create whatever lighting you like. For this one in particular, I used a spotlight and an omni light. Change your texture channel to Alpha 1 (the one we created) and set white is high and height 50.
Step 8
20. Hit okay.
Step 9
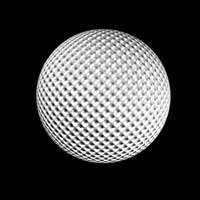
21. Now we’ll delete the extra material. Ctrl-click the original circle layer, invert the selection, and hit Backspace. Good. It’s just a little harsh. No sweat, we’ll lighten it up a bit with levels.
Step 10

22. Press Ctrl-L to go into levels, and drag the Black triangle on the gradient at the bottom of the dialogue up to 125. I also brought the grey point down to 1.30
Step 11
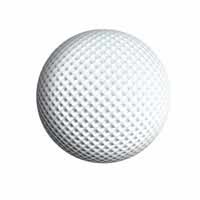
22. Now we’ll just finish it up with some layer effects. Hide the two source layers, and double click the final render to get into layer effects.
Here I used the following…
Inner Shadow
Hard Light with Black
Angle -159
Distance 49 px
Choke 0%
Size 62 px
Colour Overlay
Blending mode Color
Colour #929AA0
Opacity 100%
Gradient Overlay
Blending Mode Overlay
Style: Linear
Angle 24 degrees
Scale 70%
I also made the background white again.
Here is the final before touhups…
Step 12 
Photoshop VAULT
Access valuable Photoshop extras and goodies for free and much more a

One thought on “Golf Ball Photoshop Tutorial”
Leave a Reply
How to Light a photo in Photoshop with the Lighting Effects Filter. Create a spotlight, or colored gel light instantly.

Learn how to dodge and burn in Photoshop, make photos look 3d with depth of toning and highlights in this...
How to make jaw dropping photo realistic embosses in Photoshop. This photoshop tutorial shows how to make 3D looking bevels...


Hi,
I am currently in the process of following your steps. I am new to Photoshop so I am going slowly and doing everything correctly. I am currently on step 5 and whenever I go to Filter > Distort, the distort option is greyed out. I tried selecting just the ellipse layer or layer 1, but both still have the option greyed out. I am not totally sure what I am doing wrong. Since you didn’t specify what size the circle had to be, I just drew one and it says the dimensions are 48200×48200.