
Photoshop CS6 3D
By Stephen Burns
Repousse was the old title for the 3D engine in Photoshop. It has now been repurposed into 3D Extrusion in Photoshop CS6 Extended. We are going to explore a creative approach to creating a 3D scene exclusively in CS6. So let’s get started.
Workflow Overview
Step 1
Create a new file at 5×5 inches with a resolution of 200 PPI and type out text in all caps titled “PHOTOSHOP 3D”. When done go to the 3D menu and select “New 3D Extrusion from Selected Layer”.

Figure 1 -New 3D Extrusion from Selected Layer.
Step 2
Immediately you get an extruded 3D version of your text. Photoshop will ask you if you would like to switch to the 3D interface. I recommend that you chose to work in the 3D space as shown in figure 2. You can move, rotate or pan your 3D object by accessing the Move tool (V) and your options bar will show you various options for navigating the 3D object. You can toggle through these options (rotate, roll, drag, slide & scale) by using the Shift V on the keyboard.
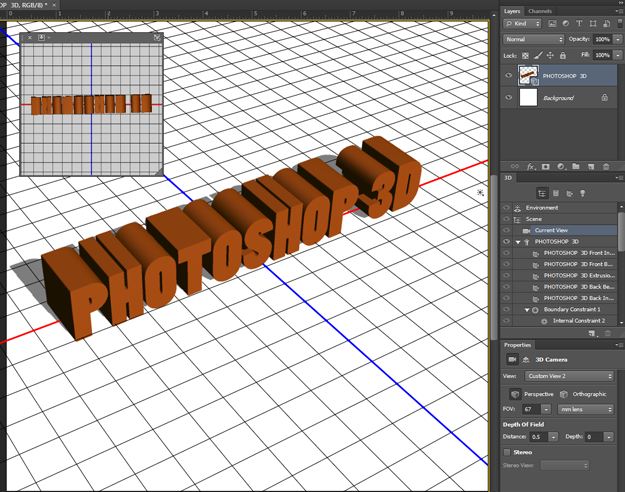
Figure 2 – View of New 3D Extrusion in 3D workspace.
Step 3
You will see a small 3D widget that will allow you to move in the X,Y,Z axis where each axis is designated with a red (X), green (Y) and blue (Z) colors. Each is joined to a yellow cube, which designates the resize function for 3D objects. However, you can enlarge this widget to assist you in your workflow by holding down the Shift key on the keyboard then click and drag on the cube upward to enlarge the widget itself. You can also drag downward to reduce the size of the widget.

Figure 3 – Enlarge 3D Widget.
Step 4
Take note that you will be working quite a bit in two panels which are the 3D & Properties panels. In the 3D panel you have the ability to access your Environment, Scenes, Cameras and any 3D object. Select the “PHOTOSHOP 3D” object and take note that the options for that object are shown in the Properties Panel. By default the Mesh button is selected on the top left corner. Select the “Extrusion Depth” slider to get a feel for extending the length of the text as shown in figure 3.

Figure 4 – Extrude text
Step 5
Now select the Deform button to the right of the Mesh and practice tapering the text extrusion. You can use the sliders to achieve this or click & drag on the widget symbols to twist, taper or extrude. For now taper the text and use the “Deformation Axis” to set the directions. Use figures 5,6 & 7 as guides.

Figure 5 – Taper towards the center
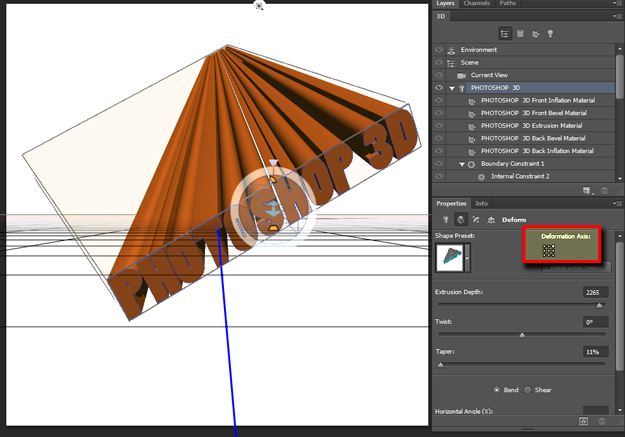
Figure 6 – Taper towards the right.

Figure 7 – Taper towards the left
Step 6
Next, apply Twist to the extruded text and notice how fast and easy Photoshop CS6 executes this command. Once done experimenting set the text back to a standard extrusion and let’s moves on to beveling the text.

Figure 8 – Twist to the extruded text.
Applying Bevel to the Extruded Object
Now that you have a feel on how to quickly extrude and modify text into a 3D shape, lets learn how to apply a bevel to its surface.
Step 1
Select the Cap button to the right of the Distort button in the Properties Panel. Near the bottom of the Properties panel, target Angle and Strength to get a bevel similar to what you see in figure 9.

Figure 9 – Apply Bevel to text.
Step 2
Click on the Contour drop menu and you will see various options for creating a beveled edge effect. You can explore these as well as make some of you own.

Figure 10 – Explore bevel styles.
Step 3
Near the bottom of the Properties panel you will see the Angle & Strength for the front inflation. This will balloon the face of the text outward or inward. The Angle controls the contour of the surface and the strength controls how far the surface will inflate or deflate as shown in figure 11 & 12. Finally, apply a simple rounded edge bevel and let’s move on to texturing our 3D objects.

Figure 11 – Explore Inflation.
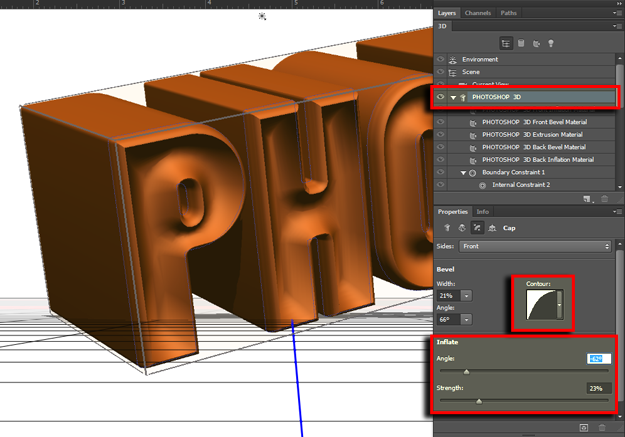
Figure 12 – Explore Deflation.
Note: I have always found that changing the color designation for any of the selected 3D objects helped me in quickly finding my way around the 3D interface. Figure 13 shows some of my settings for visuals in the 3D space.

Figure 13 – 3D color preferences.
Texturing
Now that we have our objects they will not come to life until we apply an interesting surface to them. This is where we will explore how easy it is to apply preset or custom textures to our object.
Step 1
In the 3D panel select the “PHOTOSHOP3D inflation material”. Note that all of your options for its surface show up in the Properties panel.

Figure 14 – View of the Materials panel for the inflation surface
Step 2
In the 3D Properties panel select texture preset submenu and apply any preset that you like. Don’t worry about which one because we will change it later. Just practice on applying various textures.
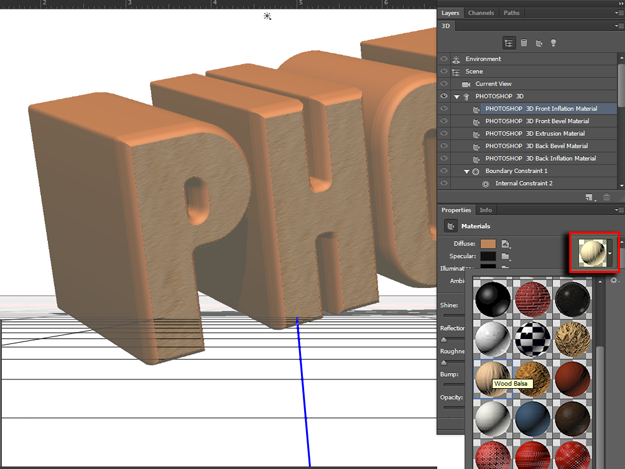
Figure 15 – Apply a preset to the Front Inflation.
Step 3
If you end up with a bunch of surfaces and you plan to have the same surface for each one there is an easy way to copy and paste the same texture on all surfaces. Access the 3D Materials Eyedropper Tool on your tool panel.

Figure 16 – Access the 3D Materials Eyedropper Tool.
Step 4
Physically place the eyedropper the front face of the font and click to sample that texture.

Figure 17 – Sample the texture on the text.
Step 5
Next, hold down the Alt/Opt key on your keyboard then click on the bevel of the text to apply the sampled texture to its surface. It’s that easy. Let’s talk about lighting next.

Figure 18 – Apply the Sampled texture to the text bevel.
Lighting
Lighting in Photoshop CS6 Extended is a lot of fun. It’s fast and responsive with convincing results.
Step 1
On the right of the 3D Panel click the light button and target the Infinite Light1. You should see a 3D representation of the light source in Photoshop. In addition you will see a shadow on the ground plane representing the direction & angle of the light source. Take note that you can change the light angle by a Shift Click & drag the shadow on the ground plane.
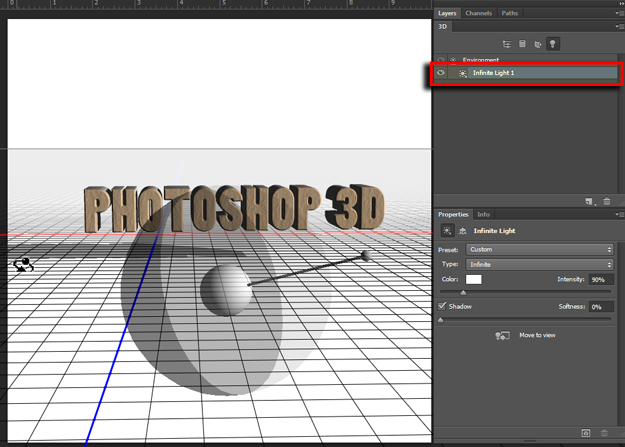
Figure 19 – Target the Infinite Light1.
Step 2
To help us see how the shadow is affected by the light, let’s quickly set the shadow on the ground (3D>Snap Object to ground Plane). Note that the main 3D object folder must be selected in the 3D panel for this option to be active as shown in figure 21. You can change the direction of the light.

Figure 20 – object above the ground plane.

Figure 21 –3D object snapped to the ground plane.
Step 3
You can make additional edits to your objects that are new in CS6. Target the internal Constraints for the “P” key located inside 3D panel as shown in figure 22. This is the constraint that makes the hole inside of the “P” object. Next, focus on the Properties panel and you will see the “Delete Constraint” button. Click it to see the effects of deleting the targeted constraint. You should something like what is shown in figure 23. However, you can create your own custom constraints via selections. For now, just draw a select in front of “P” key using the Lasso tool and in the Properties panel select “Hole” from the submenu for Type and watch Photoshop accurately create a new constraint. Use figure 24 as a guide.
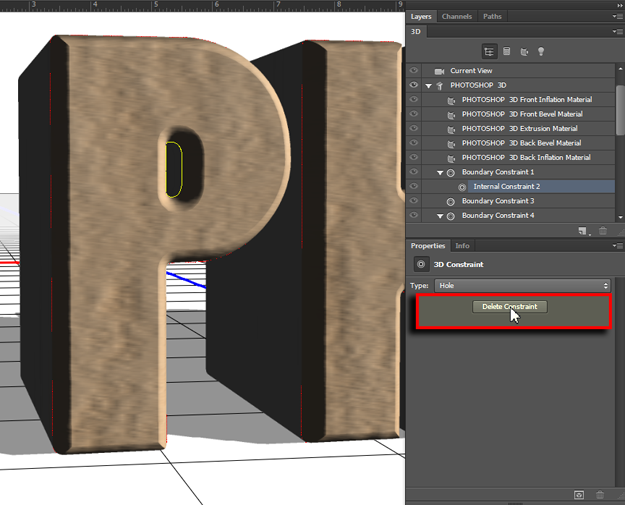
Figure 22 -Target the “Delete Constraint” button.

Figure 23 – Results of creating a new Constraint.

Figure 24 –Create the Constraint.
Step 4
That’s not all you can do with text. You can edit it as well while it’s in 3D mode. Lets’ try it. Just right click over the text and you will get quick access to the Properties panel and click the “Edit Source” button on bottom of the panel (Figure 25).

Figure 25 – Click the “Edit Source”
Step 5
Change the text to “PS CS6 3D” as shown in figures 26 & 27. Pretty cool … huh?

Figure 26 – Click the “Edit Source” button.

Figure 27 – Resource of editing the text.
Creating 3D from Painted Shapes
We are going to create a cliff for our text to sit on. We will do it using one of the square brushes in the Brush menu then extrude it into a 3D object.
Step 1
Use one of the square brushed of your choice to paint a shape with black on a new layer as shown in figure 28.

Figure 28 – Create painted shape on a new layer.
Step 2
Extrude the shape into a 3D object.

Figure 29 – Extrude the shape into a 3D object.
Note: Take note that you can see more than one camera view at a time. Click on the submenu for the additional camera view and select any view of your choice as shown in figure 30.

Figure 30 – Select additional camera view.
You switch the view to the main document by clicking the Swap Main & Secondary View button as shown in figure 31.

Figure 31 – Swap Main & Secondary View.
Step 3
Let’s apply some texture on the cliff using a photo. Select the extrusion material for the cliff.

Figure 32 – Select the extrusion material for the cliff.
Step 4
Now apply the texture on the cliff using a photo. Select the extrusion material for the cliff by clicking the submenu for the Diffuse button in the Properties panel. Click on Replace Texture and use the “texture-001.jpg”. You should see something like figure 33.

Figure 33 – Apply “texture-001.jpg” to the cliff’s extrusion.
Step 5
Let’s give the cliff some texture as well. So target the bump in the same panel and load a new texture with “texture-001 bump.jpg”. Increase the bump strength to your liking until you should see something like figure 34.

Figure 34 – Apply “texture-001.jpg” to the cliff’s extrusion.
Merge 3D Objects
So far the 3D objects are on separate layer so to get them to interact within the same scene we have to merge them. Let’s go do it.
Step 1
Select both 3D layers then merge them as a single 3D object (3D>Merge 3D Layers). Figures 35 & 36 show the before and after.

Figure 35 – Select 3D layers (before).

Figure 36 –After
Step 2
Apply “texutue-003.jpg” to the front, bevel and extrusion of the 3D text. Adjust the light so that it is emitting from the extreme right corner at approximately 45 degrees of the text.

Figure 37 – Apply texture and change lighting.
Step 3
Apply “texutue-003.jpg” to the front, bevel and extrusion of the 3D text. Adjust the light so that it is emitting from the extreme right corner at approximately 45 degrees of the text. Next, apply depth of field so that the focus favors the foreground then falls off toward the rear. Adjusts Distance and Depth until you get close to figure 37.
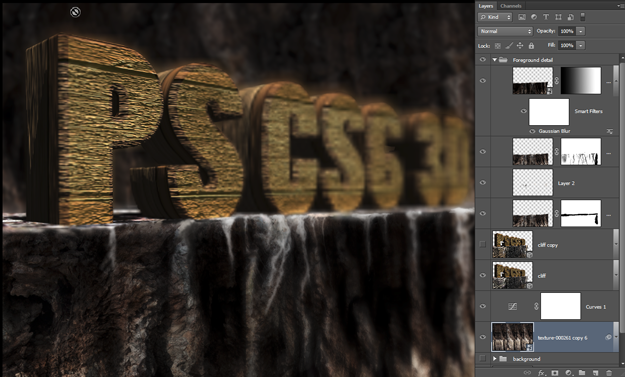
Figure 38 – Select the extrusion material for the cliff.
With some additional texturing to the cliff figure 39 was achieved.

Figure 39 – Final View.
Conclusion
I hope that enjoyed this article and that it has helped to spur your imagination as to what is possible with 3D in Photoshop CS6 extended. Experiment much and practice often to come up with your own discoveries.
About the Author
Stephen Burns (www.chromeallusion.com) has discovered the same passion for the digital medium as he has for photography as an art form. His background began as a photographer 28 year ago and in time, progressed toward the digital medium. His influences include the great Abstractionists & the Surrealists including Jackson Pollock, Wassily Kandinsky, Pablo Picasso, Franz Kline, Mark Rothko, Mark Tobey, and Lenore Fini, to name a few.
Stephen Burns has been a corporate instructor and lecturer in the application of digital art and design for the past 12 years. He has been exhibiting digital fine art internationally at galleries such as Durban Art Museum in South Africa, Citizens Gallery in Yokahama, Japan, and CECUT Museum Of Mexico to name a few. Part of his exhibiting won him 1st place in the prestigious Seybold International digital arts contest
Digital Involvement
He teaches Digital Manipulation Workshops Internationally as well as in his home town San Diego. He is an instructor on www.xtrain.com, Photoshop Café (photoshopcafe.com and a guest contributor to the Kelby Group. You will often see him as an instructor at Siggraph (www.Siggraph.org) leading the Digital Artistry Workshops.
PS Don’t forget to follow us on Social Media for more tips.. (I've been posting some fun Instagram and Facebook Stories lately)
You can get my free Layer Blending modes ebook along with dozens of exclusive Photoshop Goodies here

3 thoughts on “Photoshop CS6 3D”
Leave a Reply

How to use new Content aware fill in Photoshop CC 2019. How to remove objects in Photos, new Content Aware...
New features of Lightroom Classic CC, speed and range masking tutorial, See the range mask in action on the brush,...
How to choose the best Generative ai model in Photoshop. Firefly, Flux and Nano banana, which is best? The answer...


I don’t have the 3D tab. Any help?
3D only available in CS6 Extended version.
I was wondering where I can get a book. I like them better than videos. So thanks Haven’t used PS in so long. But, I’m back at it. Yeah!