Here’s What We Love about InDesign CS6

By David Blatner et. all
Time stoppeth for no man… or InDesign user, apparently, as Adobe today rolls out their announcement of InDesign CS6. Everyone knew CS6 was coming (Adobe said it would be released the first half of this year), and we at InDesignSecrets have all been using beta versions for a while — but until today we haven’t been able to discuss the features publicly. Now, let the floodgates open!
There are many features in InDesign CS6 to get excited about: the phenomenal ability create PDF form fields; the almost magical way you can set up objects on your page to move around when the page size changes; the option to export grayscale PDF files. There are also features that will make you scratch your head until you get used to them. For example, the Content Conveyor tools require some work to understand, but we’re convinced that some users will find this one of the most valuable features in the program.
All in all, there are dozens of new features in CS6. Until it is officially released we can’t really “review” the program as a whole, but what we can do is give you a good overview of what to expect and what you’ll want to pay attention to when CS6 shows up on your doorstep.
By the way, one of the biggest changes in CS6 is the availability of the Adobe Creative Cloud, which among other things, allows you to get access to all Adobe Creative Suite applications for a relatively modest monthly fee. We’ll be covering that in more detail in a later post.
Creating Interactive Forms
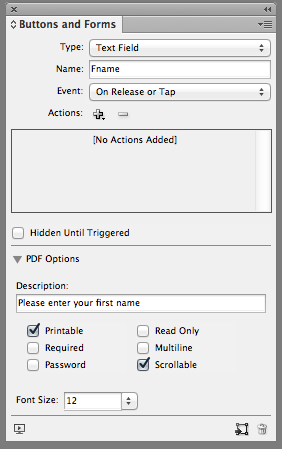
PDF forms fields (checkboxes, text entry fields, and so on) have been a long requested feature and have finally been added to InDesign CS6. The easiest way to try out the new form fields is to switch to the Interactive for PDF workspace. While you are in this workspace, there is a new library panel available under the window menu called “Sample Buttons and Forms”.
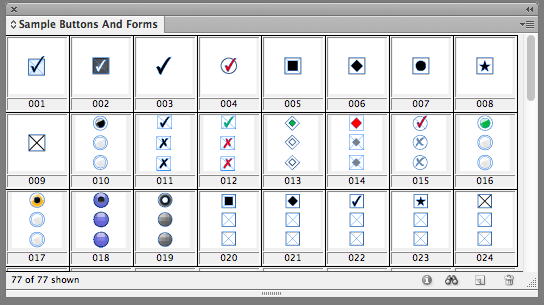
After dragging out these sample form fields into your layout you can edit them with the Buttons and Froms panel (formerly the Button Panel). From here you can modify their attributes like their description, font size, read only and more. If you prefer to create form fields from scratch you can convert any InDesign object into a text field, check box, combo box, radio button, or signature field. If you would like to test your form you will need to export your layout to an interactive PDF since the preview panel has been renamed to the more accurate SWF preview panel.
One could argue that PDF Forms are in CS6 mainly due to Tony Harmer’s ignite session at last years PepCon where he beautifully crafted a poem pleading with Adobe to add PDF forms. This just goes to show that if you really want a feature added to InDesign, pleading your case to the InDesign Team (preferably in iambic pentameter) is. — fritz
Alternate Layouts
There are several new features in CS6 that are intended to take same of the drudgery out of repurposing content for different page sizes or for output to a variety of devices with different screen sizes, resolutions, and aspect ratios.
The new Alternate Layout feature helps you create two or more layouts in a single InDesign file. For example, you could have a facing pages layout for a 6×9 inch book, a 5×5 inch book, and a 7×8 inch book all in a single InDesign file. One advantage of having the layouts in a single file is that you can use three other new features (Liquid Layout, Linked Objects, and the Content Collector/Content Placer) to help keep your content current in all your versions. — KG

Liquid Layout
Liquid Layout is intended to help reduce the amount of work it takes to reformat pages, or portions of pages, for different sizes and aspect ratios. (See this post for a sneak peak Adobe presented last October.) It’s ideal for quickly adapting layouts between multiple sizes of tablet screens, or creating a series of ads at different sizes, or even for reformatting a book into a different trim size. There is some configuration and setup involved, so it is particularly beneficial for template-driven, repetitive workflows.
To use liquid layout, you apply one of five different “rules” to page items that specify how these objects should react (move or resize) when you change the page dimensions. You test these rules by temporarily tugging on the page edges with the Page tool. Once you have the rules established, then you either permanently change the page size with the Page tool and the Control bar, or create an Alternate Layout with a new page size, telling InDesign to apply your liquid layout rules as the alternate layout is created. — KG
Linked Content
Liquid Layout is intended to help reduce the amount of work it takes to reformat pages, or portions of pages, for different sizes and aspect ratios. (See this post for a sneak peak Adobe presented last October.) It’s ideal for quickly adapting layouts between multiple sizes of tablet screens, or creating a series of ads at different sizes, or even for reformatting a book into a different trim size. There is some configuration and setup involved, so it is particularly beneficial for template-driven, repetitive workflows.
To use liquid layout, you apply one of five different “rules” to page items that specify how these objects should react (move or resize) when you change the page dimensions. You test these rules by temporarily tugging on the page edges with the Page tool. Once you have the rules established, then you either permanently change the page size with the Page tool and the Control bar, or create an Alternate Layout with a new page size, telling InDesign to apply your liquid layout rules as the alternate layout is created. — KG
Content Collector/Content Placer Tools
Continuing with the theme of making it easier to reuse content, the new Content Collector and Content Placer tools aim to make it easier to quickly copy content between page, alternate layouts, or documents.

When you choose either of these tools, a new interface element called the Content Conveyor appears on the screen.

At its simplest, these tools and the conveyor behave like copy and paste, but you get an unlimited number of “clipboards”. In other words, you can “collect” a dozen different objects from one location, and then “place” them one by one in another location. The way that the tools and the conveyor work together makes it very quick and efficient to collect and place lots of different page objects. — KG
On-object Link Status and Control
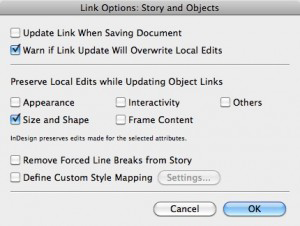
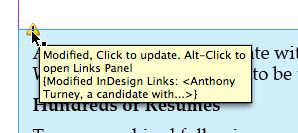
Since linked content is a lot more important in CS6, the application gives you a more obvious way to tell when a story or an object is out-of-date. By default, a linked story or object shows an on-object Link Badge. (If you don’t want to see it, turn it off in View > Extras > Show/Hide Link Badge.)

If the story or object becomes out-of-date because its parent has changed its text or appearance, you’ll see a warning triangle. Double-clicking will update the link. Option/Alt-clicking takes you to the Links panel. —Steve
Primary Text Frame
You can designate a text frame on the master page as the Primary Text Frame. (This replaces the Master Text Frame from earlier versions which never really worked the way you wanted to.)
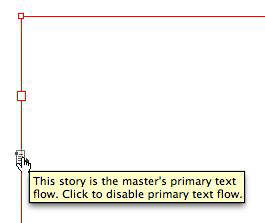
When you apply a different master page to your layout page, the story in the Primary Text Frame flows into the Primary Text Frame, following its shape and location from the new master page. And you no longer need to override a Primary Text Frame before adding text. This will eliminate a constant source of confusion for newcomers. —Steve
Text Frames that Auto-Size
The end to text frame oversets? Debuting as a new tab in the Text Frame Options dialog box, the Auto-Size controls lets you set a text frame to automatically resize itself based on the amount of text it has, dynamically moving frame edges to fit as you edit the contents. You can specify that the auto-sizing is restricted to Height Only, Width Only, or both; choose which side(s) are allowed to move and which should stay locked down, and set a minimum height and width. Auto-Size settings can be included in an Object Style, too. Think of all those sidebars, captions, and pull-quotes that you never have to worry about oversetting or manually closing up empty space as you edit the text! Very easy to get spoiled by this one. —AMC
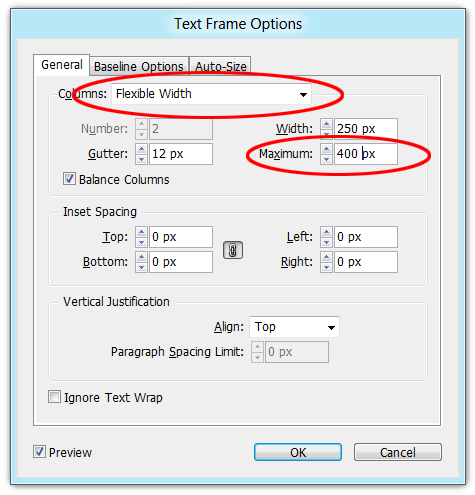
Flexible Columns
It’s a fact that long lines of text are more difficult to read than shorter ones. This is most evident in newspapers. While InDesign has long had the ability to set number of columns and the widths of those columns in a text frame, changing those attributes meant manually opening the Text Frame Options dialog box and setting those numbers.
Wouldn’t it be great if, as you changed the size of the frame, the widths of the columns adjusted? Now they can. Just set the default width for a column and should you need to adjust the width of the frame the column widths will adjust accordingly. This ties in nicely to alternate and liquid layouts where you could have a portrait and landscape orientation in one file. — Bob
In previous versions of ACR if you were to significantly darken the highlight information and bring up the shadow detail you could get significant artifacting at that transition between highlights and shadows, as in the fringing of the trees around the motorcycle seat. In the current ACR 7, there is no such artifacting and the detail throughout the image is crisper and cleaner than I would have ever imagined from a single shot!
Improved EPUB 2 Export, new EPUB 3 Export
A new dropdown menu in the EPUB Export Options dialog box gives you a choice of export formats: EPUB 2.01, EPUB 3, and an enticingly-named ”EPUB 3 with Layout.”
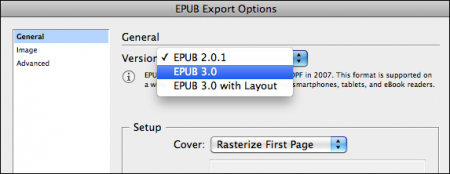
First let’s get that EPUB 3.0 with Layout one out of the way: As with a few other new commands in InDesign CS6, this option is more of a promise than a working feature. Choosing it results in a warning that it’s an “experimental” format they’re working on, aimed toward “adaptation of layouts across different mobile devices,” (so the “layout” in the name does not mean a fixed-layout EPUB), and currently only “specific Adobe viewer technologies” will work with this format, but these viewers are not named and aren’t available (yet). In other words, move on, nothing to see here folks, but we’ll let you know.
New features in EPUB 2.01 (and EPUB 3.0) are more gratifying. First, there’s the existence of the EPUB 3.0 option itself. When you choose it, you’re able to do EPUB 3-only things like create an EPUB with vertical Japanese text and placed HTML and Adobe Edge animations (which use HTML5 and CSS3), and include links to one or more external Javascript files. Exporting a document to EPUB 3.0 results in a valid EPUB 3.0 eBook, including the requisite new TOC.xhtml file and a fall-back TOC.ncx file for EPUB 2.x reading engines. Now all we need is an EPUB reader or device that understands EPUB 3, and we’re all set.

Adobe has added new features and improved the mark-up for EPUB projects in general. You now have much more flexibility when splitting a layout into multiple XHTML files in the EPUB because you can tag one or more paragraph styles to Split Document whenever you export it to EPUB. Tables retain their cell styles (they get converted to CSS) along with column width and minimum row height information. Anchored and inline text frames now retain settings like fill color, border style and width, padding (text insets) and margins for text wrap. You can link to multiple custom CSS files instead of just one. —AMC
Grayscale Preview and Grayscale PDF Export
You can preview a color file in Grayscale on the screen, and then export to a grayscale PDF right from InDesign. It’s pretty simple, but it’s something that many users have been asking for for a decade. — KG
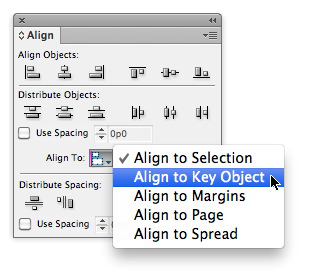
Align to Key Object
This control, which has previously only been in Illustrator, now makes its debut in InDesign. It allows you to choose which object in your selection you want your other objects to align with. To tell InDesign which object in a multiple selection is the key object, just click it. Its selection border gets an extra hit of pixels, making it easy to spot in a crowd. — KG
The Little Things
User Interface tweaks: INDESIGN HAS STOPPED YELLING AT US ALL BY DEFAULT. Whew! Panel names and workspaces are now displayed in Title Case instead of ALLCAPS. Also, there are more subtle tweaks: You can collapse panels back into the dock by clicking on their names, just like we used to do in CS4. Also, panels have a gripper bar at the bottom for resizing, close buttons are now xs instead of circles, and anchored object controls now match the layer of the frame they’re attached to. —Mike
Placeholder text language options: When you select the Type > Fill with Placeholder Text, hold Command/Ctrl to select from a list of nine languages for the placeholder text, including Roman, Greek, Hebrew, Arabic, Japanese, Korean, and Chinese. But sadly, no bacon ipsum, Elvish, or Klingon yet. –Mike
Split Window: The Split Window icon, located in the far bottom right of each document window does one simple thing—it splits the window into two separate views. This provides a quick, straightforward way to see two different views of your layout at once. You can zoom in on the page in one view, and see the entire page in the other view. Or, you can work on a master page in one view and see page six in the second view. Or, view your horizontal-orientation tablet layout in one view, and the vertical-orientation alternate layout in the other view. — KG
Complex Calculations in Dialog Boxes and Panels: You can now enter something like 45/6*79 and InDesign will calculate the correct answer. –Mike
Digital Publishing workspace: The “Interactive” workspace has been updated to “Digital Publishing,” which includes the Liquid Layout panel and the DPS Folio Builder panel. You will still need to download the latest DPS tools separately; once you do, then this workspace will also contain the Folio Producer panel. –Mike
Export to PNG (with transparency): You can export a selection, a page range, or a document to PNG. –Mike
Extension Manager Sets: You can create and manage sets of extensions through the CS6 Extension Manager just like the old feature of plug-in sets. —Mike
Hunspell Dictionary default: For most languages, the Hunspell open source dictionaries are now the default dictionaries for spelling and hyphenation. These are the same dictionaries used by Mac OS X, OpenOffice, and browsers like Chrome and Firefox. —Mike
Accurate screen sizing: Break out your old pica rulers and hold them up to the screen. InDesign CS6 does a much better job of matching on screen sizes to real life. —Mike
Keeps with Spans and Splits: Simply put, the keeps functions for paragraphs (Keep with Next, Keep lines together, etc.) now work on paragraphs that are set to span columns or split. Even though we’re classifying it under “little things,” we’ve been informed that getting this to work was actually quite the programming challenge, involving hundreds of hours. Huzzahs to the software engineers! —Mike
Recent Fonts List: You can now display a list of up to 50 recently-used fonts in the Control, Character, and Glyphs panels, and at the top of the installed fonts list in the Type > Font menu. —Mike
Save as IDML: While the process of downsaving via IDML hasn’t changed, the folks at Adobe have tried to take some of the mystery out of process by adding IDML to the options in the Save As dialog box, and including a message about how the downsaving process works. —Mike
PANTONE PLUS SERIES color swatch libraries: The PANTONE libraries included with InDesign have been updated with the new PANTONE PLUS SERIES colors. – KG
Name Ranges in XLSX files: A bug prevented named ranges in Excel 2007 and later from displaying in the place dialog. The only way to place named ranges was to save it back to XLS. This bug has been fixed in CS6.-Bob
Export to Interactive As Pages: InDesign CS5 and 5.5 insisted that when you choose File > Export > PDF (Interactive), you would always export spreads. You can now choose between exporting pages or spreads. The default is spreads. —Steve
Package files includes overlay assets: With CS5 and CS5.5 anything used only in an overlay such as an HTML page or an audio controller image was ignored in the package process. CS6 creates an Overlay Assets folder for these objects. –Bob
For More Information
Of course, this short article only scratches the surface of each of these features. If you want to go deeper, check out:
Issue 47 of InDesign Magazine. This not only has a great roundup of CS6 features by Mike Rankin, but also includes great InDepth features about Alternate Layouts and Liquid Layout by Claudia McCue and Pariah Burke. Subscribers will get this issue immediately; it sometimes takes a handful of days to get it available for non-subscribers.
Adobe TV has a ton of movies ready to play on all the CS6 products. [Sorry, public link to come ASAP.]
And, of course, we’ll be covering CS6 for months to come at InDesignSecrets. Be sure to check back periodically for the newest info. Of course, we won’t forget about users of CS5 and earlier… we know that not everyone can upgrade right away.
About the Author(s)
Anne-Marie Concepcion, David Blatner, Bob Levine, Keith Gilbert, James Fritz, Mike Rankin and Steve Werner
PS Don’t forget to follow us on Social Media for more tips.. (I've been posting some fun Instagram and Facebook Stories lately)
You can get my free Layer Blending modes ebook along with dozens of exclusive Photoshop Goodies here


Amazing Adobe AI Photoshop 1-click Season change on your photos, how to use Landscape mixer
How to replace sky in Photoshop, sky replacement new features and free sky images from Adobe.

Learn about Content aware fill, puppet warp, HDR, Brushes, HDR toning, lens correction, refine edge and other features introduced in...